How to bulk edit Google Photos
Bulk edit Google Photos — apply Auto Enhance, filters, crops, captions, and Custom Presets across hundreds of photos at once with a free Chrome extension.
Batch is not affiliated with Google. Google Photos is a trademark of Google LLC.
Most of your Google Photos library is sitting there as it came off the camera. You've meant to do something about it for years — and the moment you try, you hit the same wall: Google Photos edits one photo at a time, and there's no built-in way to bulk edit Google Photos in a single pass. Bulk editing — sometimes called batch editing or mass editing — means applying the same edits across many photos at once.
This is a complete guide to editing photos in Google Photos. It covers every part of the editor, how to find it, what each tool does, when to use which one. It also covers the part almost every other guide skips: how to bulk edit Google Photos instead of one at a time. That's where the gap between "I learned the editor" and "my whole library actually looks good" gets closed.
This guide is for anyone who's at home in Google Photos but isn't running Lightroom. Most of you came here from a phone, an iPhone backing up to Google Photos, an Android phone running Google Photos as the default, or a desktop where you upload from a folder. You don't need a separate editor; you need to know what's already in front of you and how to use it efficiently.
Is there a way to bulk edit photos in Google Photos?
Short answer: not with the built-in editor. Google Photos opens one photo at a time, and the editor has no "apply to selection" option. The way people bulk edit Google Photos today is with a Chrome extension like Batch, which automates the same buttons you'd click in the web editor across hundreds of selected photos at once. Nothing leaves Google Photos — Batch just clicks faster than you can. The rest of this guide walks through the editor's tools first, then shows how to run them across a whole album.
How your photos get to Google Photos
Before any editing matters, your photos have to be in Google Photos. There are three common ways they get there.
If you shoot on an iPhone with the Google Photos app installed and backup turned on, your photos sync automatically. You take a shot at the park, and a few minutes later it's in your library on every device you're signed in on. The setting lives in the Google Photos app's backup settings.
If you're on Android with Google Photos as your default photo app, the same auto-backup works the same way, usually on by default if you set up the phone with a Google account.
If you're working from a desktop, scans, photos imported from a camera card, anything from outside a phone, go to photos.google.com and either drag files into the browser window or click the upload control in the top toolbar.
Most readers have hundreds or thousands of photos in their library by the time they end up here. Some of them you've seen recently; many you haven't thought about in years. All of them are available to edit.
A tip before going further: confirm backup is on before reading on. The rest of this guide assumes your photos are in Google Photos. If they're sitting on a phone with backup off, every workflow below stops working.
Opening and navigating the editor
The editor lives one tap or click away from any photo. On a phone, open the photo and tap Edit. On a desktop, open photos.google.com, click any photo, and click the editor icon at the top of the photo view.
Once you're in the editor, the controls are organized into tabs along the bottom (or along the side on desktop). The set is:
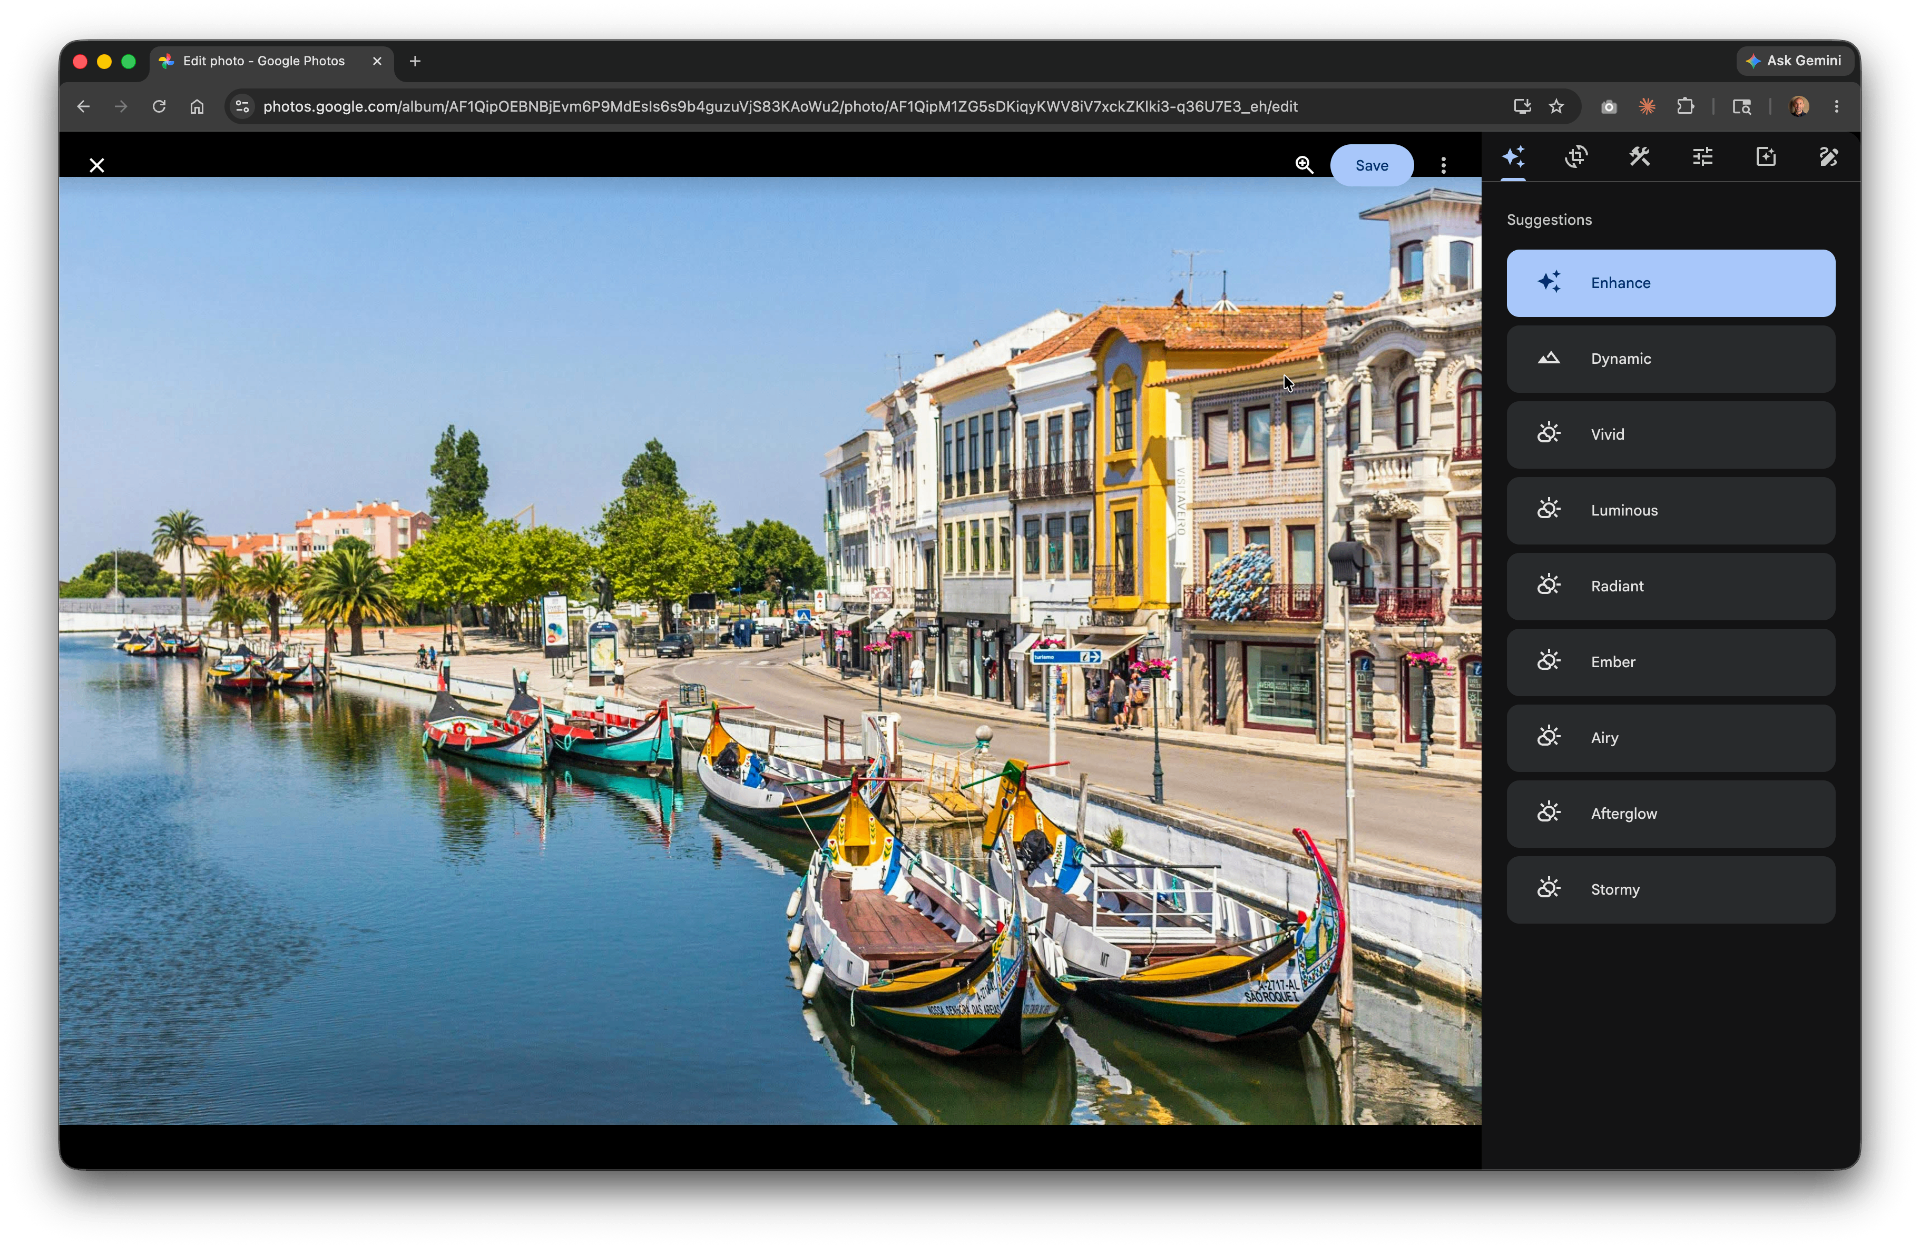
- Suggestions: Google's recommendations for this specific photo
- Crop: aspect ratio presets, free crop, rotation, straighten
- Adjust: the precise sliders for exposure, color, and tone
- Filters: the filter library
- Markup: pen and text overlays for annotation
Most of your time will be spent in Adjust and Filters for everyday editing, and Crop when reformatting photos for prints or social.
The editor isn't deep. There are no layers, no masks, no complicated curve adjustments. That's a feature, not a limitation. Most photos don't need any of that. The editor's job is to handle the eighty percent of edits the average photo needs, and it does that job well.
When you're done editing, you have two save options. Save overwrites the original. Save as copy creates a new file alongside the original, which is useful if you want to keep the unedited version available, for instance, if you're cropping the same photo to two different aspect ratios for two different uses.
A safety net worth knowing about: every edited photo can be reverted at any time. If you saved over the original a year ago and want it back, open the photo, go to the editor, and choose Revert. Google Photos keeps the original of every edit.
A tip: the desktop editor has slightly more precision than mobile for fine slider work. If you're editing more than a few photos in a session, open photos.google.com on a laptop. The keyboard shortcuts and pointer precision add up.
The editing toolbox: a navigation map
This section is the survey, not the deep dive. Most blog posts about Google Photos try to teach every feature in one sweep. That works for a thousand-word tutorial, but Google Photos is bigger than that, and the deep treatments matter most when they're paired with the specific situations they solve. Here's what's in the editor and where to find each feature covered in the context where it matters most.
Auto Enhance: one tap that improves exposure, contrast, and color balance for the typical photo. It lives in the Suggestions tab on most platforms. It's the fastest single thing you can do to a photo, and it's the right starting point for most readers. For applying it to an entire album at once, see Section 4 below. For vertical-specific examples, see the vacation albums post and the kids' sports and school photos post, both cover Auto Enhance in the context of a specific kind of pile-up.
Adjust sliders: a panel of precise controls for brightness, contrast, highlights, shadows, color saturation, warmth, and tone. The list sits in the Adjust tab. Most photo problems map to two or three sliders rather than the whole panel. A dim photo wants Brightness and Shadows; a washed-out photo wants Contrast and Saturation; a strangely tinted photo wants Warmth and Tint. For per-room slider work where consistency across multiple shots matters, see the Airbnb listing post.
Filters: Google Photos has a library of named filters, each with an intensity slider you can dial back from "obvious" to "subtle." For applying a single filter across a shop catalog or property portfolio for visual cohesion, see the reseller post and the Airbnb post.
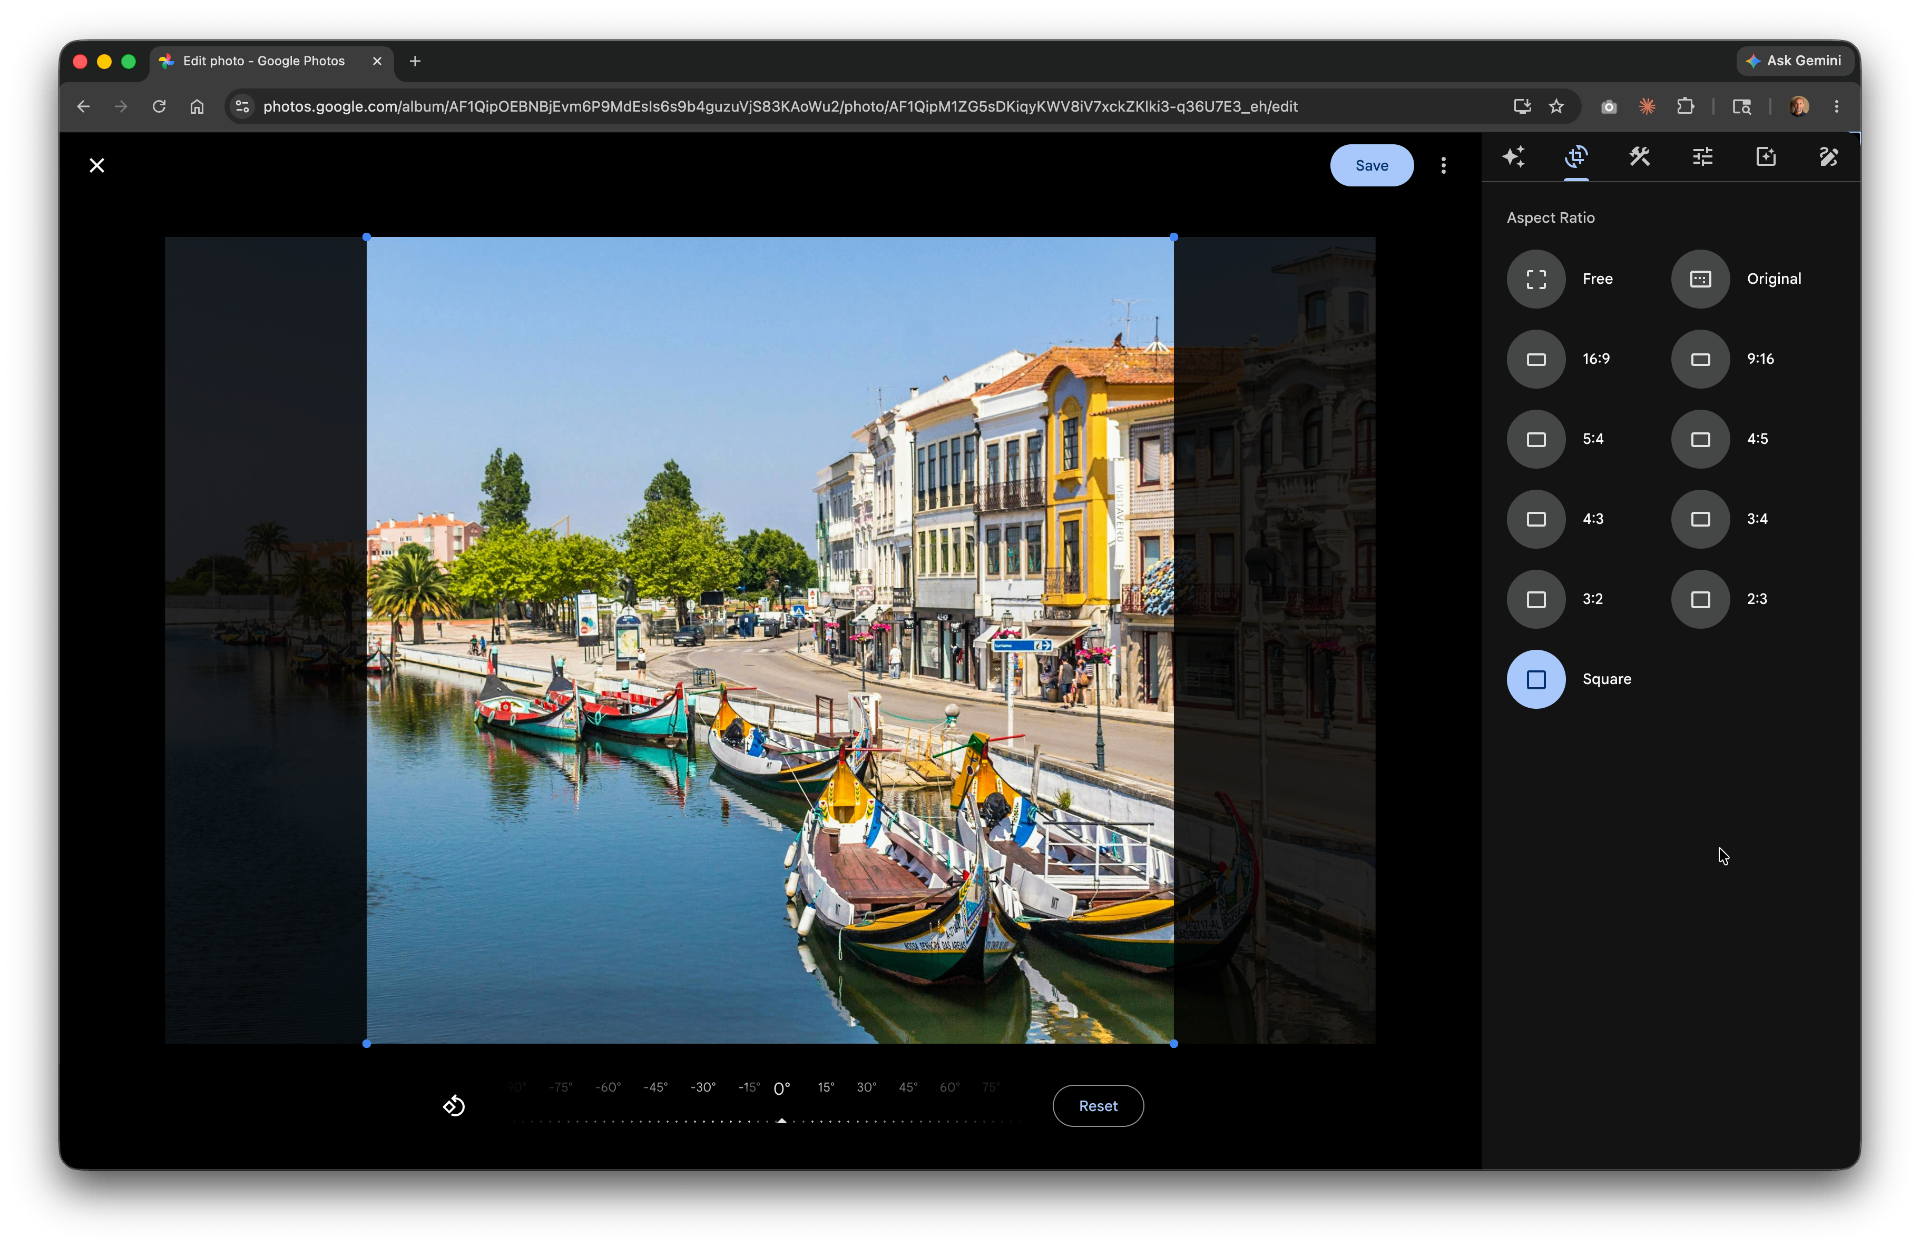
Crop and rotate: aspect ratio presets for common print and social sizes, plus free crop, rotation, and a straighten control for slightly tilted photos. Crop lives in its own tab. For batch cropping across an entire album, see Section 5 below. For marketplace and listing aspect ratios, Poshmark squares, MLS dimensions, Instagram portraits, see the reseller post and the real estate post.
A tip: pick the feature your most common pain calls for and master it first. For most readers, that's Auto Enhance. Start there, get fluent with one tool, then come back for the next one when a real situation calls for it.
Auto Enhance the whole album
Now we get to the part almost no other guide covers. You've learned how to Auto Enhance one photo. The question that comes next, and the question every reader of this guide eventually asks, is how to do that for a hundred photos without losing your afternoon.
The manual workflow looks like this. Open a photo. Tap Edit. Tap Auto Enhance. Tap Save. Hit the back arrow. Open the next photo. Repeat. Each photo takes about eight to ten seconds if you're moving fast and not pausing to look at the result. Multiply that out: a hundred photos is roughly fifteen minutes of repetitive tapping. Three hundred photos, a single vacation's worth, is closer to forty-five minutes.
That's the part that quietly defeats most people. Not the difficulty of editing one photo, but the boredom of editing the hundredth.
Or do it across your whole selection.
Batch for Google Photos is a Chrome extension built specifically for this. Batch never uploads your photos. The edits happen in your open Google Photos tab. For the full step-by-step version, see our guide to batch editing Google Photos. You select photos in your Google Photos library, click the Batch button that appears in the toolbar, choose Auto Enhance, and let Batch run while the tab stays open. It works through each photo in turn at about eight seconds each, the same as you'd do manually, but you don't have to be present. A hundred photos take about fourteen minutes hands-off. Three hundred take about forty. You can switch to other tabs and do other things while it runs.
This is where batch editing changes the workflow. Once you stop having to be present for each photo, the volume problem dissolves. The library that felt unedited starts getting edited.
A practical note on the result. Auto Enhance is calibrated for the typical photo, which is most photos but not all. On under-exposed shots with strong color casts, candle-lit dinners, amber-tinted indoor light, it occasionally over-corrects, pushing skin tones into a slightly unnatural register. Before assuming a batched album is finished, zoom into three to five representative photos at full size and confirm they look right. If something's off, the same Adjust sliders we covered above will let you fix it photo by photo.
Plus is the right tier for ongoing work. The 500-photo monthly quota covers a regular cadence of album-sized batches.

Cropping a whole album to one ratio
The next batch problem is cropping. You finish editing your trip album and want to post the best ten to social media as squares. You finish a real estate shoot and need every photo cropped to your MLS's preferred aspect ratio. You finish a product shoot for Poshmark and need every photo at 1:1.
Single-photo cropping in Google Photos is straightforward. Open the photo, go to the Crop tab, pick an aspect ratio from the presets, adjust the crop frame, save. The presets cover the common sizes: 1:1 for square, 4:5 for portrait social, 16:9 for landscape video, plus the standard print sizes. There's also a free-crop option if you want a non-standard ratio.
For one photo, this takes about thirty seconds. For fifty photos all going to the same aspect ratio, same thirty seconds, fifty times. That's roughly twenty-five minutes of repetition that produces the same outcome as if you'd applied one decision across the whole batch.
Or apply the same crop ratio across all fifty at once with batch cropping.
Same Batch tool, same workflow as Auto Enhance, select your photos, choose Auto Crop, pick the ratio, and let it run. The output is a set of photos cropped to the same aspect ratio, ready for whichever destination they're going to.
One tip on the crop itself, applicable to both single-photo and batch use: Google Photos has a suggested crop that tries to center on the most visually important element of the shot. For most photos this works well. For group photos, bridesmaids in a row, family portraits, team shots, the suggestion centers on a single face and may cut others out of the frame. Override the suggestion manually for those specific photos before running the batch, or accept that the group shots will need a second pass.
Plus is the right tier for ongoing work. The same monthly quota that covers your batch enhances also covers your batch crops, and most people use the two together, enhance the album, then crop the keepers for sharing.
Captioning a whole album with one description
The last batch problem is captioning. This is the one most people skip, and the one most people regret skipping when they go looking for a specific photo five years later.
Captions in Google Photos live in the photo's info panel. On mobile, tap the photo and swipe up; on desktop, click the info icon at the top of the photo view. There's a field labeled "Add a description." Whatever you type there becomes searchable text across your entire library, type "Mom's birthday 2024" on a photo today, and you can find that photo by typing "Mom's birthday" into the Google Photos search bar in 2030.
Manually adding a caption to one photo takes about twenty seconds. For an album of two hundred wedding photos or three hundred vacation shots, captioning every one individually means clicking through every one. Most people give up after twenty.
The batch version of this is different from Auto Enhance and crop, instead of running an automated improvement, it's applying the same human-written text across a whole selection. Useful for event-level or batch-level captions ("Smith Wedding · Reception · April 2026" on every reception photo, or "Portugal · April 2026" on every photo from the trip). The whole batch becomes findable as a group, even if you never add per-photo detail. Same Batch interface, select your photos, choose Add Caption, type the text, run. That's batch captioning in practice.
Captions matter more than they look like they do. They're the difference between a library that's findable and a library that's an opaque pile. Especially as your library grows past five thousand photos, search by caption is often the only way to surface a specific memory you know is in there somewhere.
A tip: include real searchable terms, full names, locations, events, not adjectives. Google's image search is good at recognizing objects but can't read minds. A typed name in the caption lasts forever and will outlast any AI feature evolution.
Plus is the right tier for ongoing work. Captioning at scale tends to be the workflow people return to most, since it doesn't tie to a specific event, it's the maintenance that keeps the library navigable as it grows. But editing without sharing is editing for nobody.
Saving your own look as a Custom Preset
Auto Enhance, filters, and crops are batch-friendly because they're either AI-driven or one-knob choices. The other half of the Google Photos editor — the Adjust panel, with sliders for brightness, warmth, shadows, saturation, vignette, and the rest — is where the editor's real expressive range lives. It's also the part that's hardest to repeat. Tune one wedding photo until it looks right, and there's no built-in way to get the next two hundred to that same place without redoing every slider.
Custom Presets is the part of Batch that closes that gap. Tune one photo in Google Photos' Adjust panel, save the result as a Custom Preset with a name you'll recognize, and Batch applies every one of those slider values across the rest of the selection. The adjustments are Google Photos' own, so the output looks like the rest of the editor's output — just across two hundred photos at once. Custom Presets are on every plan; they count against the same monthly quota as Auto Enhance, Filter, and Crop.
The deeper walkthrough — when to reach for a preset vs. a built-in filter, the recipes for wedding receptions, real estate, travel, and product catalogs, and what presets won't do — lives in the Custom Presets guide.
Saving, exporting, and sharing your edits
You've edited the album. Now it has to go somewhere.
Saving behavior is the same as it was earlier: every edit can be reverted to the original, and Save as copy is available if you want to preserve both versions of a photo. That safety net means you can edit aggressively without worrying about losing the original, Google Photos keeps it.
For getting photos out of Google Photos, any individual photo can be downloaded via the download menu in the photo view. For an album, multi-select the photos and download as a zip, useful when you need to upload elsewhere or hand off to a print service.
Google Photos is especially good at sharing albums. Any album can be shared via a link that works in any browser without requiring a Google account from the recipient, practical for sending wedding photos to grandparents who only check email, or vacation shots to relatives across platforms. There's also partner sharing, where you can give a specific person ongoing access to your library or a defined subset of it.
One often-overlooked feature: edits sync across every device signed into your Google account almost immediately. Edit on your laptop in the morning, see the result on your phone in the kitchen at lunch. The library is one library, no matter where you opened it.
Google Photos isn't perfect. It's not Lightroom for serious photographers, and the editor lacks some of the finer controls a professional would want. But for everyone else, anyone with a phone, a personal library, and a steady accumulation of photos, it's one of the few photo libraries that gives you a viable editing environment for free at the scale of a real personal collection.
If your library is starting to bump against Google's storage limit, our guide to freeing up Google Photos storage covers the cleanup steps most people miss.
Your library is a living thing. Edit it like one.
Stop editing one photo at a time
Batch applies Google Photos edits — including your own Custom Presets — across selected photos while your tab stays open.
Start free · Works in Chrome on desktop · Photos stay in Google Photos
Where to go next
- Google Photos storage full? Here's how to actually free up spaceSeven ways to free up Google Photos storage, including the one most guides skip.
- The 5 best Chrome extensions for Google Photos in 2026Five Chrome extensions for Google Photos, compared honestly by what each does best.
- How to create and apply custom presets in Google PhotosSave one tuned photo as a preset, apply it across the album.
- Free up Google Photos storage by converting Live Photos to stillsReclaim Google Photos storage by converting Live Photos to stills in bulk.
- Cleaning up wedding photos in Google PhotosFinish the guest album before the photographer's gallery arrives.
- Editing Airbnb listing photos in Google PhotosStandardize listing photos across every property.
- Editing product photos in Google PhotosPrep an entire product drop without per-photo work.
- Editing real estate photos in Google PhotosOne consistent edit pass across the whole listing set.
- Restoring old family photos in Google PhotosFinish the family archive you've been avoiding for years.
- Editing sports photos in Google PhotosProcess tonight's game photos before bed, not next weekend.