Editing real estate photos in Google Photos
Bulk edit real estate photos in Google Photos — apply the same edits across a listing set without leaving Chrome.
Batch is not affiliated with Google. Google Photos is a trademark of Google LLC.
You toured the property this morning. The listing goes live tomorrow. You have 40 phone photos and 30 minutes between contract review and dinner. The MLS will accept whatever you upload, but the photos that earn attention are the ones that look like the room felt: bright, accurate, framed cleanly. Phone photos out of the camera roll don't look like that. They look like phone photos.
If you shoot your listings on your phone, your photos are already in Google Photos because that's where your phone backs up. That's not a workaround. It's what makes a 30-minute listing-prep window feasible. The photos are already organized chronologically; you need to brighten them, crop them for the MLS and your social posts, and upload.
If you've looked at Lightroom and decided it's overkill at your listing volume, you're not alone. Lightroom is the canonical answer for full-time real estate photographers who shoot 50+ properties a month on a DSLR. That's not your business. Your business is closing 8 to 25 houses a year, mostly in the $200-500K range, and shooting the listing photos yourself because hiring a pro photographer at hundreds of dollars per listing eats your commission on lower-margin properties.
Here's the arc. Shoot the right photos per room (the part most agents underdo). Get them organized in Google Photos. Pick the hero shot and the gallery sequence. Brighten interiors at scale. Crop for MLS, social, and flyers. Apply a consistent filter so every listing carries your agent brand. Upload to MLS and post to social.
This post will not replace pro photography for luxury listings. If you're listing a $1M+ property where photo quality directly determines price discovery, hire a pro. Lightroom and a paid shoot will outperform anything in this post. For agents working the bulk of the market (the $200-500K homes that make up most of any region's listing inventory), the workflow below is the realistic answer.
Shooting listing photos on your phone: what to capture per room
Quick reference for the property tour, room by room.
Exterior: wide front shot is the highest priority, this is your MLS hero. Shoot from across the street if the lot allows; the additional distance gives you the whole house in frame without the lens-distortion squat that comes from shooting too close. Detail shots of unique features (the garden, the porch, the unusual roof line) go in the gallery.
Living spaces: wide-angle from the corner showing the most of the room, usually the corner farthest from the windows, shooting toward the windows. A secondary angle showing flow into adjacent space (kitchen visible from living room, dining room visible from kitchen) gives the gallery rhythm.
Bedrooms: wide from the doorway showing the bed, the dresser, and at least one window. Avoid shooting from above the bed. The angle reads as cramped.
Kitchen: wide showing appliances, then a detail shot of any selling-point feature (the island, the backsplash, the high-end range). Avoid shooting from the seating side; shoot from the doorway looking into the work area.
Bathrooms: wide showing the vanity. If the bathroom is small (most are), the phone's ultra-wide lens or panorama mode covers what a pro would use a wide-angle lens for. Skip the toilet from a flattering angle. There isn't one.
Outdoor space: ground-level wide shot showing the depth of the yard. If there's a deck or patio, shoot from the lawn looking back at the house. That's the angle that sells the outdoor living scene.
A tip: shoot every room twice. Once wide for MLS, once detail for social. The wide goes on the MLS gallery; the detail (the sun coming through the kitchen window, the unique tile in the entryway, the view from the deck) goes on Instagram and your agent newsletter. Two passes, one tour, no second visit.
Getting your listing photos into Google Photos and organized
Photos auto-sync to Google Photos via your phone's backup. By the time you're back at your desk, the property is already in your library.
For a solo agent on a single listing, the organization is one album per property. Create the album in your library, name it with the date and address ("2026-04-26 · 123 Main St"), add today's photos. The date prefix lets the album sort chronologically when you have a year of listings stacked up.
For higher-volume agents listing 15+ properties a year, the album-tree approach holds up further than you'd expect. Google Photos doesn't support nested folders, so you can't have a "2026" parent with sub-albums for each listing, the list is flat. But the YYYY-MM-DD-Address naming convention makes the flat list navigable. "2026-04-26, 123 Main St" sorts cleanly next to "2026-04-15, 456 Oak Ave" and "2026-03-30, 789 Pine Way." The list reads as a chronological timeline of your listings.
The other tool is search. Google Photos' search runs across your entire library, search "kitchen" to find every kitchen photo across every listing you've ever shot. This is genuinely useful when you're showing comparable properties to a buyer and want to pull recent kitchen photos from listings in the same neighborhood. The flat album list serves as a backup index; day-to-day finding is search.
A tip: turn off automatic sharing to family group albums temporarily during a property shoot. Agents accidentally sharing listing photos to their family album is a real-world embarrassment that happens more than you'd think, your phone has the family album set to auto-add favorites, you star a few listing photos as your shortlist, and now your in-laws are asking why you sent them photos of someone's bathroom.
Picking the hero shot and per-room highlights
Most MLS systems show one hero photo prominently and gallery the rest. For most listings, the safest hero is the exterior wide. But if the property's strongest selling point is a view, a pool, an open-concept kitchen, or a unique architectural element, use the photo that best explains why someone should click. The gallery's first 4-6 photos, what buyers see when they expand the listing, are usually the wide-angle living spaces, kitchen, and primary bedroom. Detail shots and outdoor space go later in the sequence.
In Google Photos, mark your shortlist with the favorites or star feature. Tap the star on the exterior wide, the living room wide, the kitchen wide, the primary bedroom wide. Then sort the album by favorites. That's your gallery in order.
Newer MLS systems pull the photo order from your upload sequence; older ones may reorder them based on internal logic. Confirm with your local MLS guidance, since regional systems behave slightly differently. The naming convention you used for the GP album (date + address) carries no weight in the MLS; the upload order does.
A tip: the photo a buyer scrolls to second matters as much as the hero. The exterior wide hooks them; the second photo is what makes them keep scrolling. Make sure it's the strongest interior wide (the living room or the open-concept main floor), not a random kitchen detail.

Brightening every interior in a listing
Phone interior shots come out dimmer than the rooms looked in person. Interior light is warm and indirect; phones underexpose to protect the window highlights. The result is a gallery where every interior looks like the listing was shot at dusk.
Single-photo workflow: open the photo, tap Edit, tap Auto Enhance, tap Save. The Auto Enhance pass corrects exposure and color balance and usually rescues a dim interior into something that reads as bright and inviting.
For 40 listing photos, manual Auto Enhance is 8 to 10 minutes. That's time you don't have between dinner and listing prep, and that's assuming you can stay focused for the full pass without interruption from family or another contract notification.
Or do it across the whole listing at once.
Batch for Google Photos is a Chrome extension that handles exactly this kind of repetitive single-photo work across a selection. Batch sidesteps that family-album risk entirely: it doesn't use shared albums or upload anywhere. Edits run in your own Google Photos tab. For the full step-by-step version, see our guide to batch editing Google Photos. Open the listing's album, click Batch in the toolbar, choose Auto Enhance, and let Batch work through the selection while the tab stays open. The whole listing takes 5 to 6 minutes hands-off, long enough to write the listing description, short enough that the photos are ready before you stop typing.
A practical note for real estate specifically: Auto Enhance occasionally crushes window detail in rooms with strong outdoor light. If you're listing a property where the view is part of the selling point, waterfront, mountain view, downtown skyline from a high floor, spot-check those rooms after the batch finishes. The Adjust panel's Highlights slider recovers blown-out window detail manually if Auto Enhance pushed too hard.
Plus is the right tier for ongoing work. An agent listing 15 properties a year is running this workflow 15+ times annually; the volume justifies the tier upgrade in the first month.
Cropping for MLS and social
Most MLS systems prefer 4:3 or 3:2 landscape source. Some accept anything and crop to fit; others reject photos that fall below dimension minimums. Cropping in Google Photos before uploading gives you control; letting the MLS auto-crop gives the MLS control.
Single-photo cropping: open the photo, Crop tab, pick 4:3 or 3:2 from the aspect ratio presets, adjust the crop frame, save.
For higher-volume agents, the multi-platform reality multiplies the cropping problem fast. The same listing photos may need to land on the MLS (4:3 or 3:2), Instagram (1:1 or 4:5 for grid posts), Facebook (varies by post type), the brokerage's own website (varies), Zillow's gallery (full-width landscape), the printed flyer for the open house (8.5x11 letter or postcard formats), and the new-listing postcard (varies). Cropping the same set of photos to multiple ratios manually is hours per listing. Missing one platform means awkwardly-cropped photos lock into the listing record forever, Zillow keeps closed listings indexed; the bad crop on Facebook stays in your business page archive; the flyer is in PDF storage at the brokerage. Listings expire; the photos don't.
Or apply the same crop ratio across all 40 photos at once with batch cropping. Same Batch tool. Run it for the MLS first, then again for Instagram, then again for the flyer dimensions. Each pass takes a few minutes; the manual alternative is each pass taking an hour.
A tip: shoot landscape source at every opportunity. Landscape source crops to vertical and square cleanly; vertical source rarely crops well to landscape. The exception is staircases and tall windows, which call for vertical source and become the awkward photos in your gallery if you shot them landscape.
Plus is the right tier for ongoing work. A dozen listings a year with multi-platform crops fits inside the monthly Plus quota.
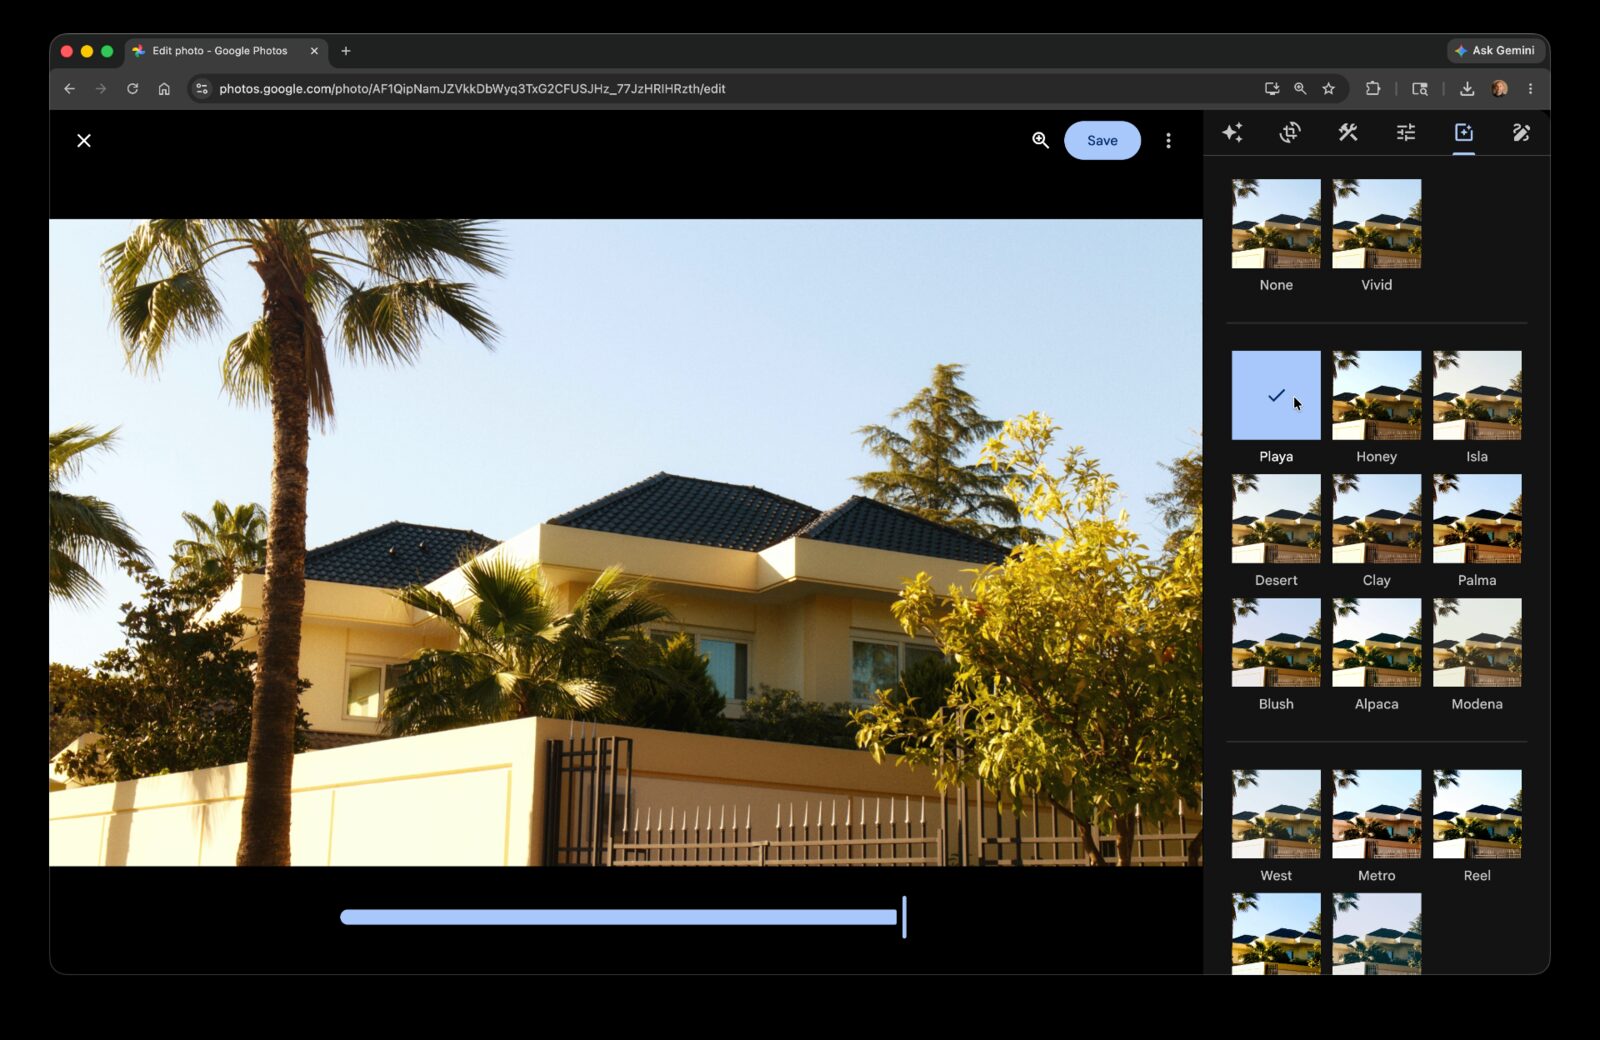
Applying a consistent listing filter
Your listings carry your agent brand, every photo signals it's yours. That's the goal of this section.
For solo agents on one listing, the filter pass is optional polish. For higher-volume agents, a consistent filter across every listing creates an agent's visual brand on Zillow, on the brokerage website, in the social feed. Buyers scrolling through dozens of listings start to recognize yours visually before they read your name. Pro real estate photographers do this with Lightroom presets; without Lightroom, GP filters approximate it.
Google Photos has a library of named filters, each with an intensity slider. For real estate, low intensity is the right choice, the filter should create cohesion without affecting color accuracy. Buyers expect listings to look like the rooms will look in person; a heavy filter undermines that trust.
Single-photo workflow: open a photo, Filters tab, pick the filter, dial the intensity to 30 to 40 percent, save.
Or apply the same filter at the same intensity across the whole listing with batch filter. Same Batch tool. Pick the filter once, set the intensity, run.
A tip: for real estate specifically, a slight warm filter reads as "inviting"; a cool filter reads as "modern." Match the filter to what the property is selling. A cottage on a lake is selling rest. A downtown loft is selling sophistication. The filter should reinforce the message, not contradict it. The same filter at the same intensity won't suit every property, but every property of similar type benefits from the same treatment, which is what builds the brand recognition over time. A neutral filter at low intensity works well for most listings.
Plus is the right tier for ongoing work. A consistent filter across every listing for the year fits well inside the monthly Plus quota.
Exporting and uploading to MLS and other platforms
The photos are edited, cropped, and on-brand. Time to upload.
In Google Photos, multi-select the photos for the listing, then download them, either as individual files or as a zip from the download menu. From your laptop, the download lands in your Downloads folder; from there, the platform-specific upload flows take over.
MLS upload varies by region. Each regional system has its own upload interface, file-size limits, and photo ordering rules. Google Photos downloads at full resolution; some MLS systems require compression before upload. Your local MLS documentation covers the specifics.
For Zillow's free agent listing tool (if your brokerage doesn't already syndicate to Zillow): drag-and-drop the downloaded photos into the Zillow listing editor. Zillow accepts higher-resolution photos than most regional MLS systems do.
For your brokerage's own website, social posts, and the printed flyer: same flow, different uploaders. The crop variants you ran in the previous section land on the platform that needs them.
A maintenance tip: keep a "Listed" album in Google Photos. Move each listing's album there once it's live. This makes it easy to refresh seasonal photos for re-listings (winter exterior to spring exterior), pull historical photos for a comparable, or share the gallery with another agent in your office who's working a similar property.
Frequently asked questions
What dimensions should I shoot listing photos at?
Most MLS systems accept 1024×683 minimum at 3:2 or 4:3 landscape ratio. Phone cameras shoot at much higher resolution than that, so the source dimensions are rarely the limit. Framing matters more than pixel count.
How many photos should I include in a listing?
Most MLS systems recommend 15 to 30 photos for a typical residential listing. Buyers expect to see the exterior wide, every major room, kitchen, bathrooms, and outdoor space. More than 40 photos diminishes returns; fewer than 12 reads as incomplete.
Do I need to hire a professional photographer for $200-500K homes?
The break-even point varies by market, but most agents working below the luxury price band shoot their own listings. Professional photographers typically charge hundreds of dollars per listing, which compounds across a year of mid-price-band volume. The workflow in this post is the realistic alternative for that segment.
How long does it take to edit photos for one listing?
Manual edit of 40 phone photos takes 30 to 40 minutes if you're focused: 8 to 10 minutes for Auto Enhance, 12 to 15 minutes for cropping to MLS plus social, the rest for filter and review. Batch reduces the active time to about 5 minutes hands-off, with the heavy work happening while you write the listing description.
Should I let the MLS auto-crop my photos or crop them myself?
Cropping yourself before uploading gives you control over what stays in frame; letting the MLS auto-crop gives the MLS control. For listings where a specific compositional element matters (the view through a window, a kitchen island, the way a room flows), crop yourself. For straightforward rooms, MLS auto-crop is acceptable.
Are phone photos good enough for an MLS listing?
For most $200-500K listings, yes. Modern phone cameras handle interior brightness, color, and depth better than dedicated cameras did a decade ago. The post-processing in this guide compensates for the typical phone shortcomings (window glare, dim interiors, color casts). For luxury listings where photo quality drives the listing's price discovery, hire a professional photographer instead.
You've got the workflow for one listing. The same pattern repeats for every listing you'll shoot.
The pillar guide on editing photos in Google Photos covers the editor's tools in depth, useful for the parts of your library that aren't real estate, where you might need different filters or different crops than what works for listings.
The Airbnb listing photos post walks through a parallel workflow for hosts editing rental property photos at scale. The cropping and filter sections in particular translate directly, the platform requirements differ but the workflow shape is identical.
If you shoot enough listings that the same brighten-and-warm pass is your house style, the Custom Presets guide is the next read. Tune one interior, save the adjustments as a Custom Preset, and Batch applies that exact look across every listing you shoot from now on — same brightness lift, same warmth, same desaturation, every time.
Your listings outlive the deal. Edit them like they'll be there long after the closing.
Stop editing every listing photo one at a time
Batch helps apply the same edits across selected listing photos while you work in Chrome.
Start free · Works in Chrome on desktop · Photos stay in Google Photos