Editing product photos in Google Photos
Bulk edit product photos in Google Photos — crop, brighten, and standardize a whole batch for Etsy, eBay, and Shopify.
Batch is not affiliated with Google. Google Photos is a trademark of Google LLC.
You shoot products in your living room with your phone. Your photos are already in Google Photos because that's where your phone backs up. The question isn't where to edit them. It's how to get through 80 photos a week without losing the time you're trying to convert into revenue.
If you've looked at Lightroom and decided it's overkill at this volume, you're not the only one. Lightroom is the canonical answer for studio product photographers who shoot on a DSLR with controlled lighting. That's not the reseller economy. The reseller economy is iPhone photos taken on a window-lit dining table, edited in whatever fifteen-minute window opens up between sourcing and listing.
A note on Photoroom before this post starts. Photoroom is genuinely good at one specific job: cutting a product out of its background and replacing the background with white or a custom scene. If that's what you need, for a hero shot on a clean studio backdrop, for example, use Photoroom. This post is about a different job: batch enhance and crop on photos already in your Google Photos library. Use Photoroom when background removal is the problem. Use Batch when repetition is the problem.
Here's the arc. Get the studio setup right. Organize photos by listing or category. Pick the hero shot and detail shots per item. Crop everything to 1:1 for marketplaces. Brighten the living-room shots. Apply a consistent filter for shop branding. Upload to Poshmark, Etsy, and eBay.
This post will not cover background removal. That's Photoroom's job. It will not pretend you should be doing studio shots. You shouldn't. Your customers don't expect them, and the time investment doesn't return.
From phone to Google Photos: your living-room studio setup
Most resellers run something like this: a window for natural light, a white sheet or piece of foam board for backdrop, a phone on a tripod or held steady against something solid. That's the studio. It works because resellers aren't selling perfection. They're selling a clean, accurate view of the item that helps a buyer decide.
Your phone backs up to Google Photos automatically, assuming the toggle is on. On both iPhone and Android, the toggle lives in the Google Photos app's Backup settings. Verify it's on once; you don't have to think about it again.
This is what makes the rest of the workflow possible. No exporting, no transferring, no AirDrop chains. The photo you took ten seconds ago is in Google Photos within thirty. From your laptop, you can open photos.google.com and the photo is already there.
A tip: shoot all your batch in one session with one consistent light source. Time of day matters, morning light and afternoon light have different color temperatures, and an Auto Enhance pass that works for the morning batch may not work for the afternoon batch. Pick a window of consistent light, shoot through it, edit through it, list through it.
Organizing photos by listing or category
For a hobbyist reseller running 50 active listings, organization is straightforward. Create one album per sourcing batch ("Goodwill Apr 26") or one album per category ("Vintage tees"). Add photos as you shoot. Don't overthink it.
For serious resellers running 200+ active listings, the album-tree approach starts to fall apart. Google Photos doesn't support nested folders, you can't have a "2026" parent with sub-albums for each month, you can't have a "Vintage tees" parent with sub-albums for each brand. The album list is flat, and at 200 albums that list becomes its own navigation problem.
The workaround is search. Google Photos' search runs across your whole library, search "shoes" to surface every shoe photo across every batch you've ever shot, regardless of which album it's in. For high-volume operators, the search-based workflow is genuinely faster than browsing albums. Combined with a consistent naming convention (the album list still serves as a backup index), the flat album structure scales further than it looks like it should.
A tip: photograph each item with its first photo facing the camera straight-on, even before you start the detail shots. This makes search and visual scanning later much easier, when you're scrolling through your library looking for "that beige sweater I sourced in March," the straight-on hero is what registers.
Picking your hero shot vs. detail shots
Marketplaces show the hero shot prominently. Poshmark crops to a square hero in the feed. eBay's gallery uses the first photo as the headline. Etsy's listing template showcases the first photo at the largest size on the page.
The hero should show the full item. Detail shots prove condition. The hero shot is straight-on, well-lit, and on a clean background; the buyer should be able to see the whole item without scrolling. Detail shots, flaws, tags, unique features, close-ups of texture or stitching, go after the hero. Position two and three are usually a slight angle variation on the hero (45 degrees, full back) that gives the buyer a fuller picture without yet showing the fine detail.
In Google Photos, mark your hero per item with the favorites or star feature. When you're scanning the album later for upload, your shortlist is starred and easy to find.
A tip: shoot the hero shot first while you're set up. Move into detail shots after. This forces you to think about which angle is the listing's lead before you get distracted documenting tags and stitching. The hero is the most important photo per item; treating it as the first decision keeps it from being an afterthought.
Cropping product photos to 1:1 for marketplaces
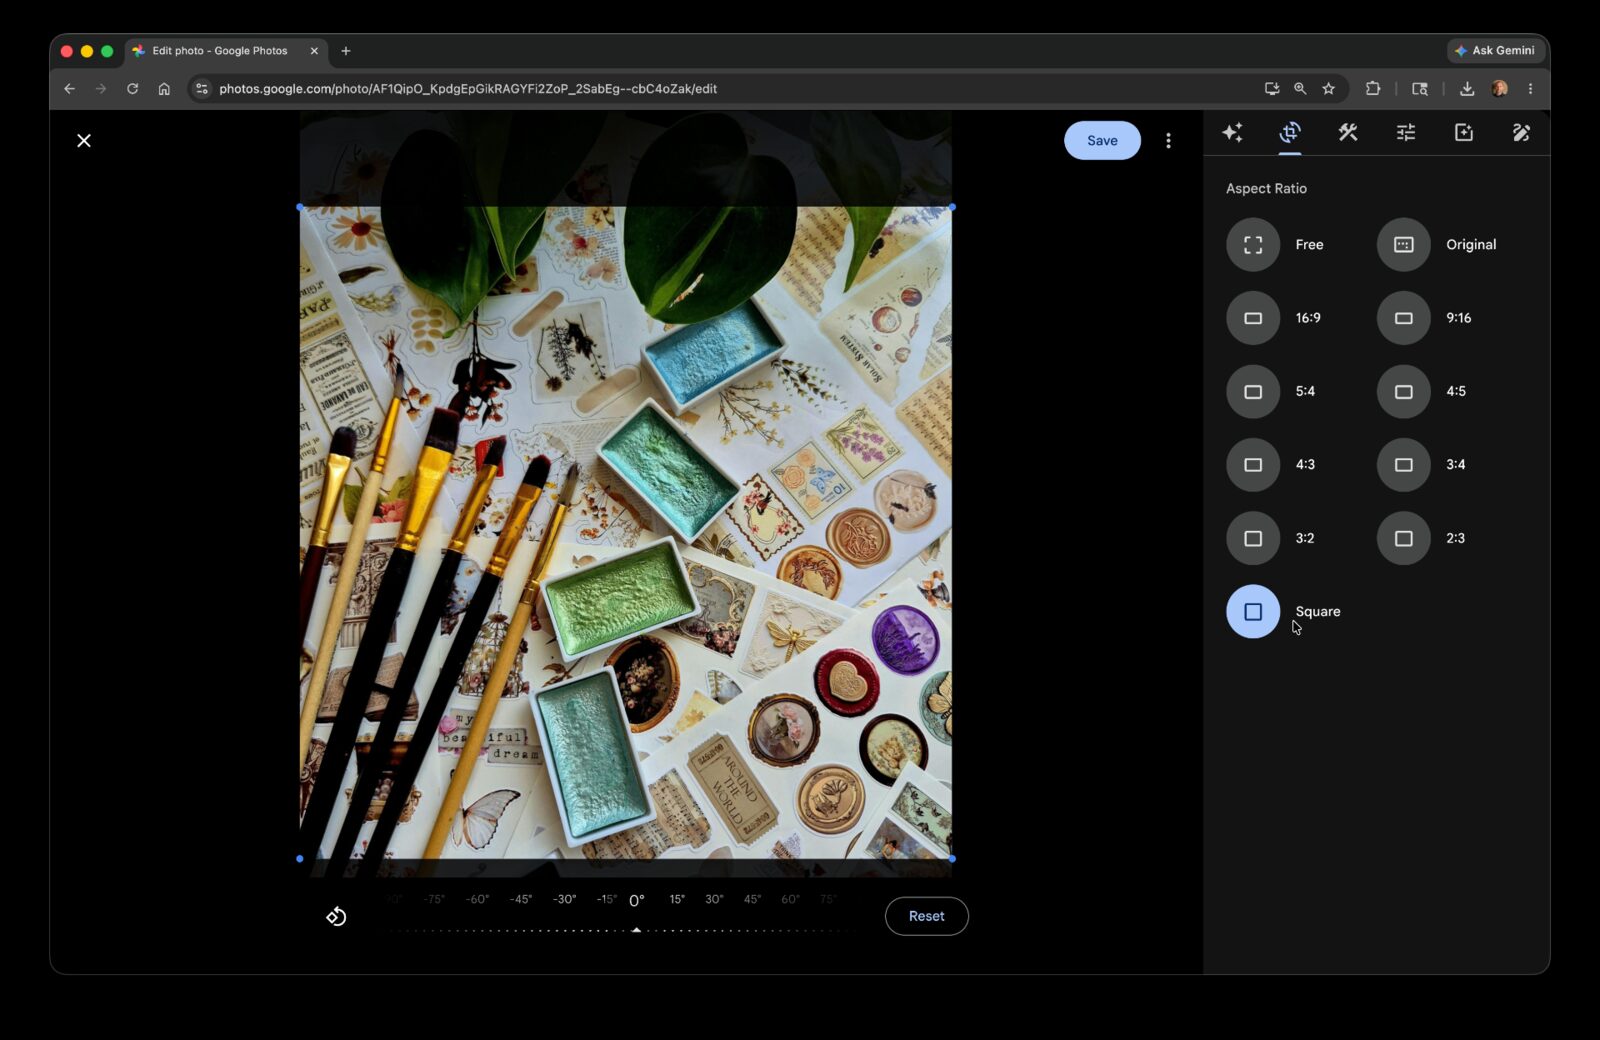
This is the section that earns the workflow. Marketplaces want square photos. Poshmark in particular is square-by-default. The platform displays product images as 1:1 in feeds and search results. Photos shot in 4:3 or 3:2 (the iPhone defaults) get auto-cropped, and Poshmark's auto-crop sometimes cuts your hero in awkward ways.
Single-photo cropping in Google Photos: open the photo, Edit, Crop, pick 1:1 from the aspect ratio presets, adjust the crop frame to keep the item centered, save. About thirty seconds per photo.
For 12 sourced items × 7 photos each = 84 photos. That's 40 to 45 minutes of repetitive cropping, on a Saturday morning when you should be sourcing your next batch.
Or apply the same crop ratio across all 84 at once with Batch for Google Photos. Batch never uploads your photos. The edits happen in your open Google Photos tab. For the full step-by-step version, see our guide to batch editing Google Photos.
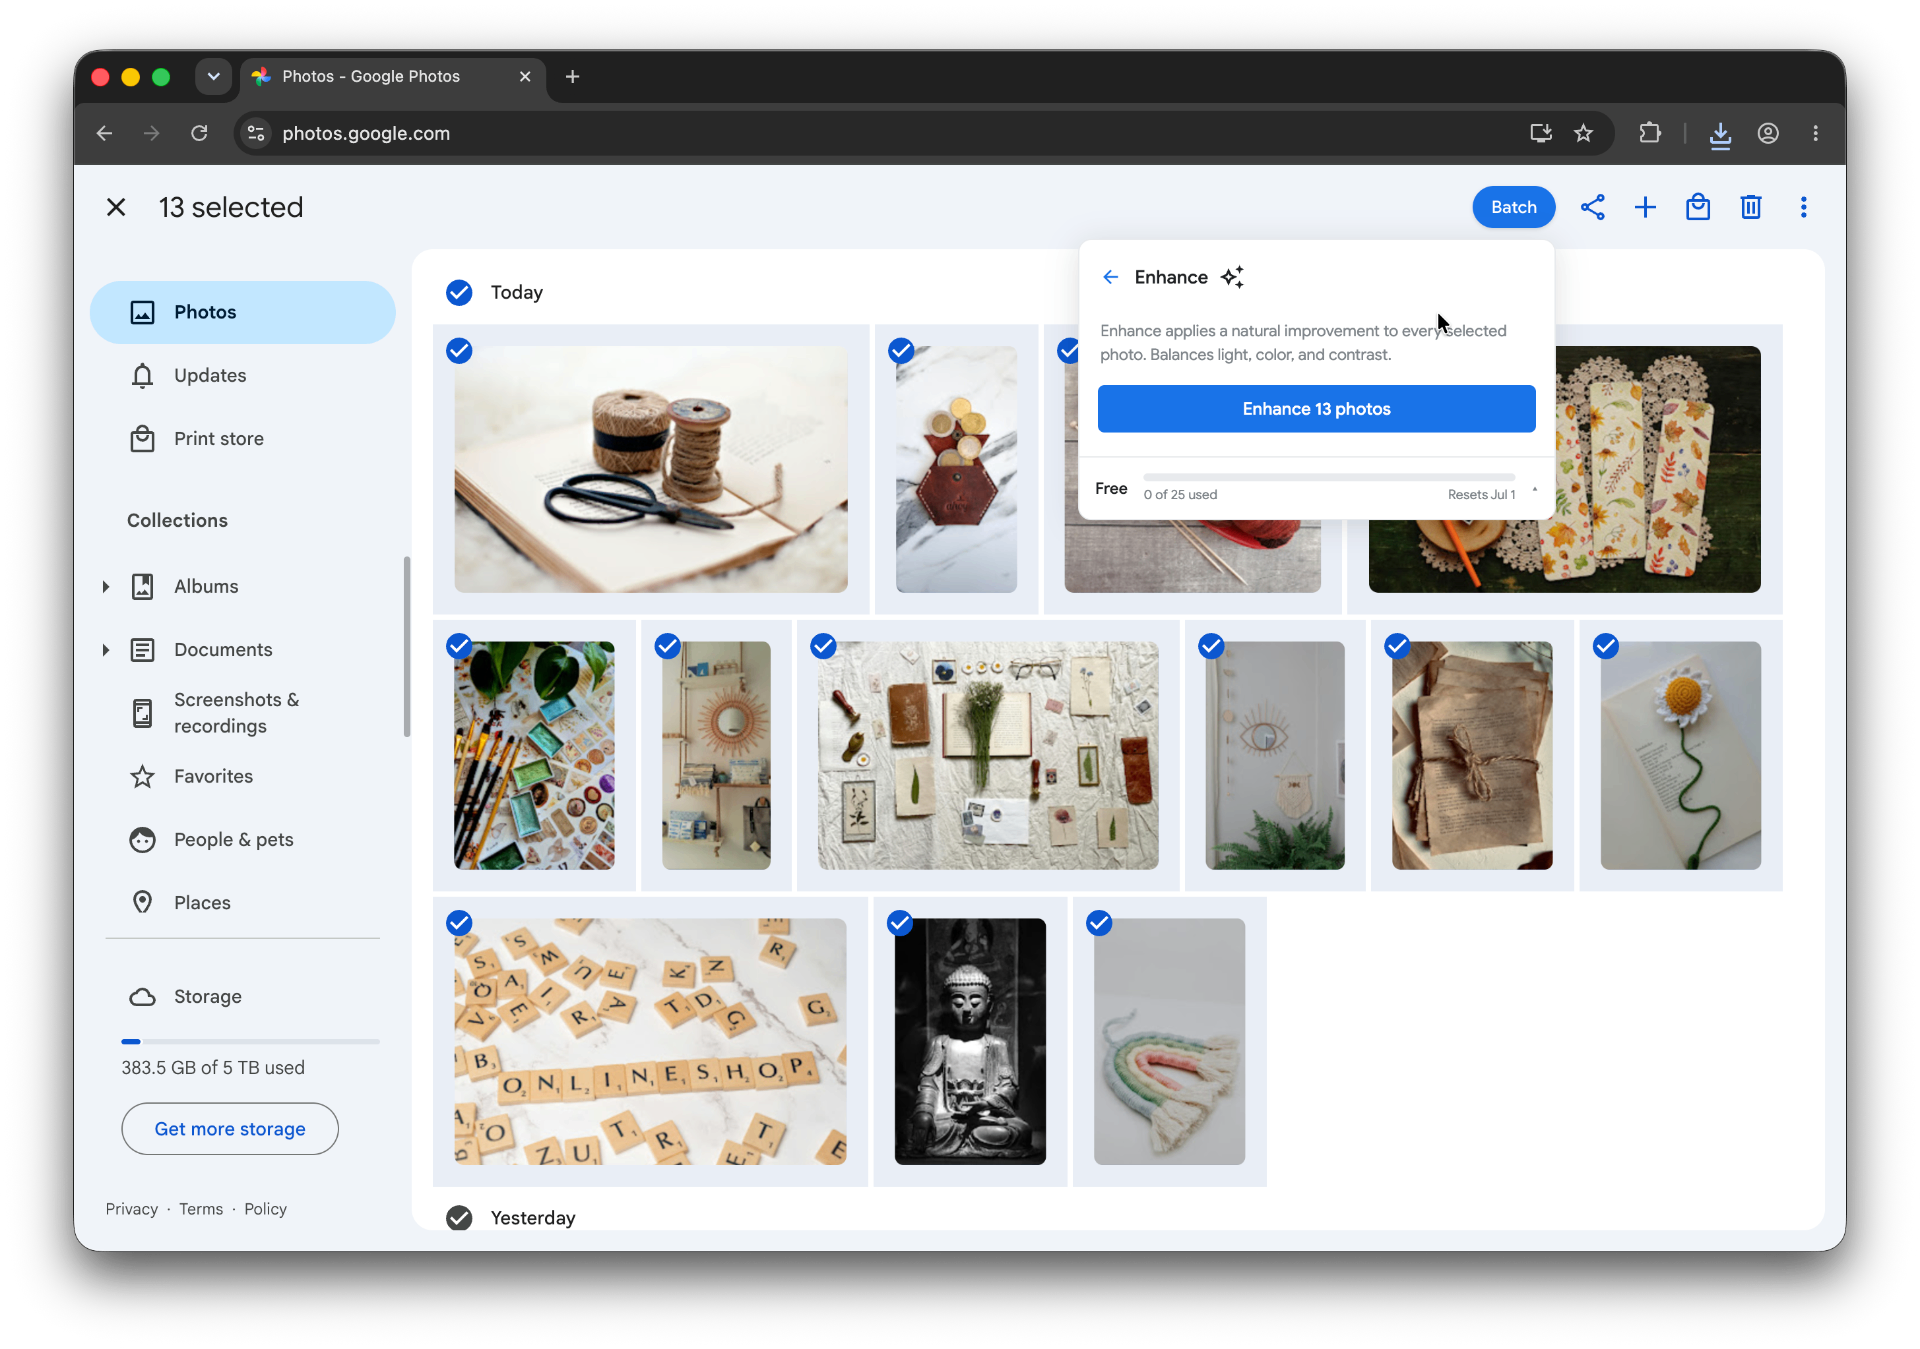
The Batch extension lives in the Google Photos toolbar. Select the batch you want to crop, click Batch, choose Auto Crop, pick 1:1, and let Batch work through the selection while the tab stays open. The whole batch takes about 12 minutes hands-off, long enough to actually start writing the listing descriptions instead of cropping while you write them.
A tip for resellers specifically: when Google Photos' suggested crop centers on the wrong feature, a tag instead of the garment, a clasp instead of the bag, override it with manual centering on the hero shots only. The other six to ten photos per item are usually less sensitive to crop framing, but spot-check them before upload. The hero needs your eye; the detail shots need a glance.
Plus is the right tier for ongoing work. Resellers running weekly batches end up doing this workflow 50+ times a year; the volume justifies the tier upgrade fast.
Brightening living-room shots
Even with consistent window light, exposure varies. Item color matters, a black sweater photographs darker than a white one. Time of day matters, morning light tilts cool, afternoon light tilts warm. Cloud cover matters. The same setup can produce wildly different exposures across a single sourcing batch.
Single-photo Auto Enhance: open the photo, Edit, Auto Enhance, Save. The Auto Enhance pass corrects exposure and color and usually rescues a dim or muddy product shot into something that looks like the item actually looks.
For 84 photos in a sourcing batch, manual Auto Enhance is 15 to 20 minutes. After the cropping section above, you're now adding another 20 minutes to a workflow that was already on hour two of a Saturday morning.
Or do it across the whole batch in five minutes. Same Batch interface, select the photos, choose Auto Enhance, and let it run. The same 84 photos finish hands-off while you write listing copy.
A tip: dark items often look muddy after Auto Enhance because the algorithm tries to brighten the shadows, which on a black sweater produces a gray-looking sweater. For batches dominated by dark items (vintage leather, navy bags, charcoal denim), consider applying a manual Brightness adjustment of +1 or +2 instead of Auto Enhance, the Brightness slider lifts the whole image evenly without trying to recover shadow detail that doesn't exist.
Plus is the right tier for ongoing work. Weekly batches of 80 to 100 photos land well inside the monthly Plus quota.
Applying a consistent filter for shop branding
Your shop has a recognizable visual identity buyers can associate with you. That's the goal of this section.
For hobbyist resellers, the filter pass is optional polish. For serious resellers running 200+ listings, consistent visual branding across every listing photo drives buyer trust and repeat customers. The shop that looks like every photo was taken by the same person, with the same color treatment, reads as a real operation. The shop where every listing looks like it was photographed in a different decade reads as a flea market.
Consistency helps your shop feel trustworthy, but color accuracy comes first. Google Photos has a library of named filters, each with an intensity slider. For product photography, low intensity is the right choice, the filter should create cohesion without affecting color accuracy. Returns and bad reviews trace back to color shifts more often than to anything else about the photo. A heavy filter is one of the most common causes.
For higher-volume operators specifically: a single consistent filter across every listing creates a recognizable shop identity that buyers start to associate with you over time. This is what Lightroom presets do for pro sellers. Without Lightroom, GP filters approximate the same effect, pick one, set its intensity at 30 to 40 percent, and apply it across every batch you shoot.
Or apply the same filter at the same intensity across your whole batch with batch filter. Same Batch tool, same workflow.
A tip: pick a low-intensity neutral filter at 30 to 40 percent intensity. Heavier filters compromise color accuracy, which buyers notice and complain about in returns and reviews. The goal is "subtle cohesion across listings," not "Instagram-style stylization."
Plus is the right tier for ongoing work. A weekly filter pass across each sourcing batch fits inside the monthly Plus quota.
Uploading to Poshmark, Etsy, and eBay
The photos are cropped, enhanced, and on-brand. Time to list.
In Google Photos, multi-select the photos for one item, then download them, either as individual files or as a zip from the download menu. From there, the upload flow varies by platform.
Poshmark is mobile-first. The Poshmark app uploads from your camera roll directly, so on iPhone you'd save the downloads to your photo library and then upload from the app. Etsy is desktop-first, drag-and-drop into the listing editor in your browser. eBay works on both, with a slightly cleaner desktop experience.
For resellers managing multiple platforms simultaneously, crosslisting tools (List Perfectly, Vendoo, Crosslist) accept your edited photos once and distribute them across marketplaces. The Google Photos workflow above produces the source files; the crosslisting tools take it from there. Most serious resellers end up using both.
A maintenance tip: keep a "Listed" album in Google Photos. Move each item's photos there once the listing is up. For higher-volume operators, add a "Sold" or "Archived" album so your library doesn't become a second inventory system you can't navigate. This makes it easy to see what's still in the queue and what's already live, and to find the original photos when a buyer asks a question about a listing you put up three weeks ago.
You've got the workflow for one sourcing batch. The same pattern repeats for every batch you'll shoot.
The pillar guide on editing photos in Google Photos covers the editor's tools in depth, useful for the personal photos in your library that aren't product work, where you might want a different filter or a different crop than what works for listings.
The Airbnb hosts post walks through a parallel workflow for hosts editing listing photos at scale. The cropping and filter sections in particular translate directly, Airbnb hosts and resellers have nearly identical pain shapes, with different platforms and different aspect ratios.
Once you've settled on a catalog look you want every drop to match, the Custom Presets guide is the next read. Save one tuned product shot as a Custom Preset and Batch applies the same brightness, warmth, and saturation across every future drop — consistent listings without rebuilding the look from scratch each time.
Your listings are how buyers find you. Make them look like one operator's work.
Stop editing every product photo by hand
Batch helps crop, brighten, and standardize product photos across a selected set.
Start free · Works in Chrome on desktop · Photos stay in Google Photos