Enhancing vacation photos in Google Photos
Bulk edit vacation photos in Google Photos — enhance and crop the whole trip backlog into an album you actually share.
Batch is not affiliated with Google. Google Photos is a trademark of Google LLC.
You came home with 340 photos. You posted 8 to Instagram. The other 332 are sitting in your Google Photos library, untouched. Some are gorgeous. Many need work. None of them are getting it, because the thought of editing 332 photos one at a time is the reason you've barely opened the album since you got back.
If you shoot on your phone, the structural work is already done. Backup runs automatically; the photos arrived in your library while you were still at the airport. The auto-Memories feature has probably already grouped them as a trip. What's left is the editing pass that turns a shoeboxed roll of half-good photos into a shareable album.
Post-trip enthusiasm fades after about a month. This is the workflow that makes that month productive instead of wasted.
Here's the arc. Find your trip in Google Photos (it's already there). Pick the keepers from the 340. Create the album you'll actually share. Auto Enhance the whole trip in one pass. Apply a consistent travel filter so the album reads as one trip, not a collage. Crop the keepers for Instagram and prints. Share the album with the people who couldn't come.
By the end you'll have a trip album that does the trip justice, ready to send to family before they forget you were gone.
Your vacation photos are already organized
You don't have to do anything to find your trip. Google Photos auto-groups travel by location and date. Open the Memories view in Google Photos, and the trip is probably already there as a card titled with the place and dates. Tap it; you see the trip as a chronological scroll.
If Memories didn't surface it for some reason, search works equally well. Type the destination ("Portugal") into the search bar at the top, and Google Photos returns every photo with location data from there. This is faster than scrolling chronologically through your library, especially for trips that happened more than a few weeks ago.
A tip: open the auto-grouped trip view first, before you create any new albums. Most travelers create a manual album immediately and end up with two parallel collections, the one Google made automatically and the one they curated. Use the auto-group as your working set; only make the manual album when you're ready to share a curated subset.
Picking the keepers from 340 photos
The realistic shareable count from a 340-photo trip is somewhere between 30 and 80 photos. The rest are duplicates, near-duplicates, blurry attempts, accidental floor shots, that one photo of a menu you meant to delete, the seventeen near-identical photos of the same sunset.
Use Google Photos' favorites or star feature to mark your shortlist. Tap the star icon on each photo you want in the album. Then sort the trip view by favorites to see your keepers together; the rest stay in the library but out of the way.
The AI-powered search inside the trip is the speedup most people miss. Search "sunset" inside your trip album to find every sunset shot from the trip, pick your favorite, star it, move on. Search "food" for every meal photo. Search the name of someone you traveled with (if they're in your face groups) to find every photo of them specifically. This turns the curation pass from "scroll through 340" into "decide on 30 categories of 10 photos each."
A tip: do the curation pass before any editing. Most travelers make the opposite mistake, they enhance every photo, then realize they were never going to share most of them. The thirty minutes you spend curating up front saves three hours of unnecessary editing.
Creating a trip album to share
Once you have your keepers starred, create the album you'll actually share. Open your library, create a new album, and name it with the destination and date ("Portugal · April 2026") so it's findable years later when you're looking back at every trip you've taken.
Add the keepers. If you traveled with someone, turn on contributor settings so they can add their photos too, your partner shooting a 0.5x ultra-wide of the same view you shot in standard captures it differently, and both belong in the album.
The auto-Memories grouping and the manual album are now distinct things. The Memories card is everything from the trip; the manual album is your curated 30 to 80 keepers. The album is what you share; the Memories grouping is your reference for everything else.
A tip: name the album with the date as a prefix. "2026-04 · Portugal" reads cleanly in a list of trip albums and sorts chronologically. "Our Portugal Trip" doesn't. Future-you will be looking at this list of trip albums in five years, trying to remember which trip was which; the date prefix is the search aid.
Auto Enhance the whole trip
This is the post-trip pass that turns an unedited library into a shareable album. Reception lighting, indoor restaurant photos, sunset shots, anything dim or backlit benefits from Auto Enhance, and "anything dim or backlit" describes about half of any trip's photos.
Single-photo workflow: open the photo, tap Edit, tap Auto Enhance, tap Save. The Auto Enhance pass corrects exposure and color balance and usually rescues an unshareable photo into something you'd happily send to your parents.
For 340 vacation photos, expect about 50 to 60 minutes of tapping if you're focused. Most travelers never finish. The photos sit indefinitely. The album you intended to share with grandparents three weeks ago is still in your library, half-edited, and the trip is already starting to feel distant.
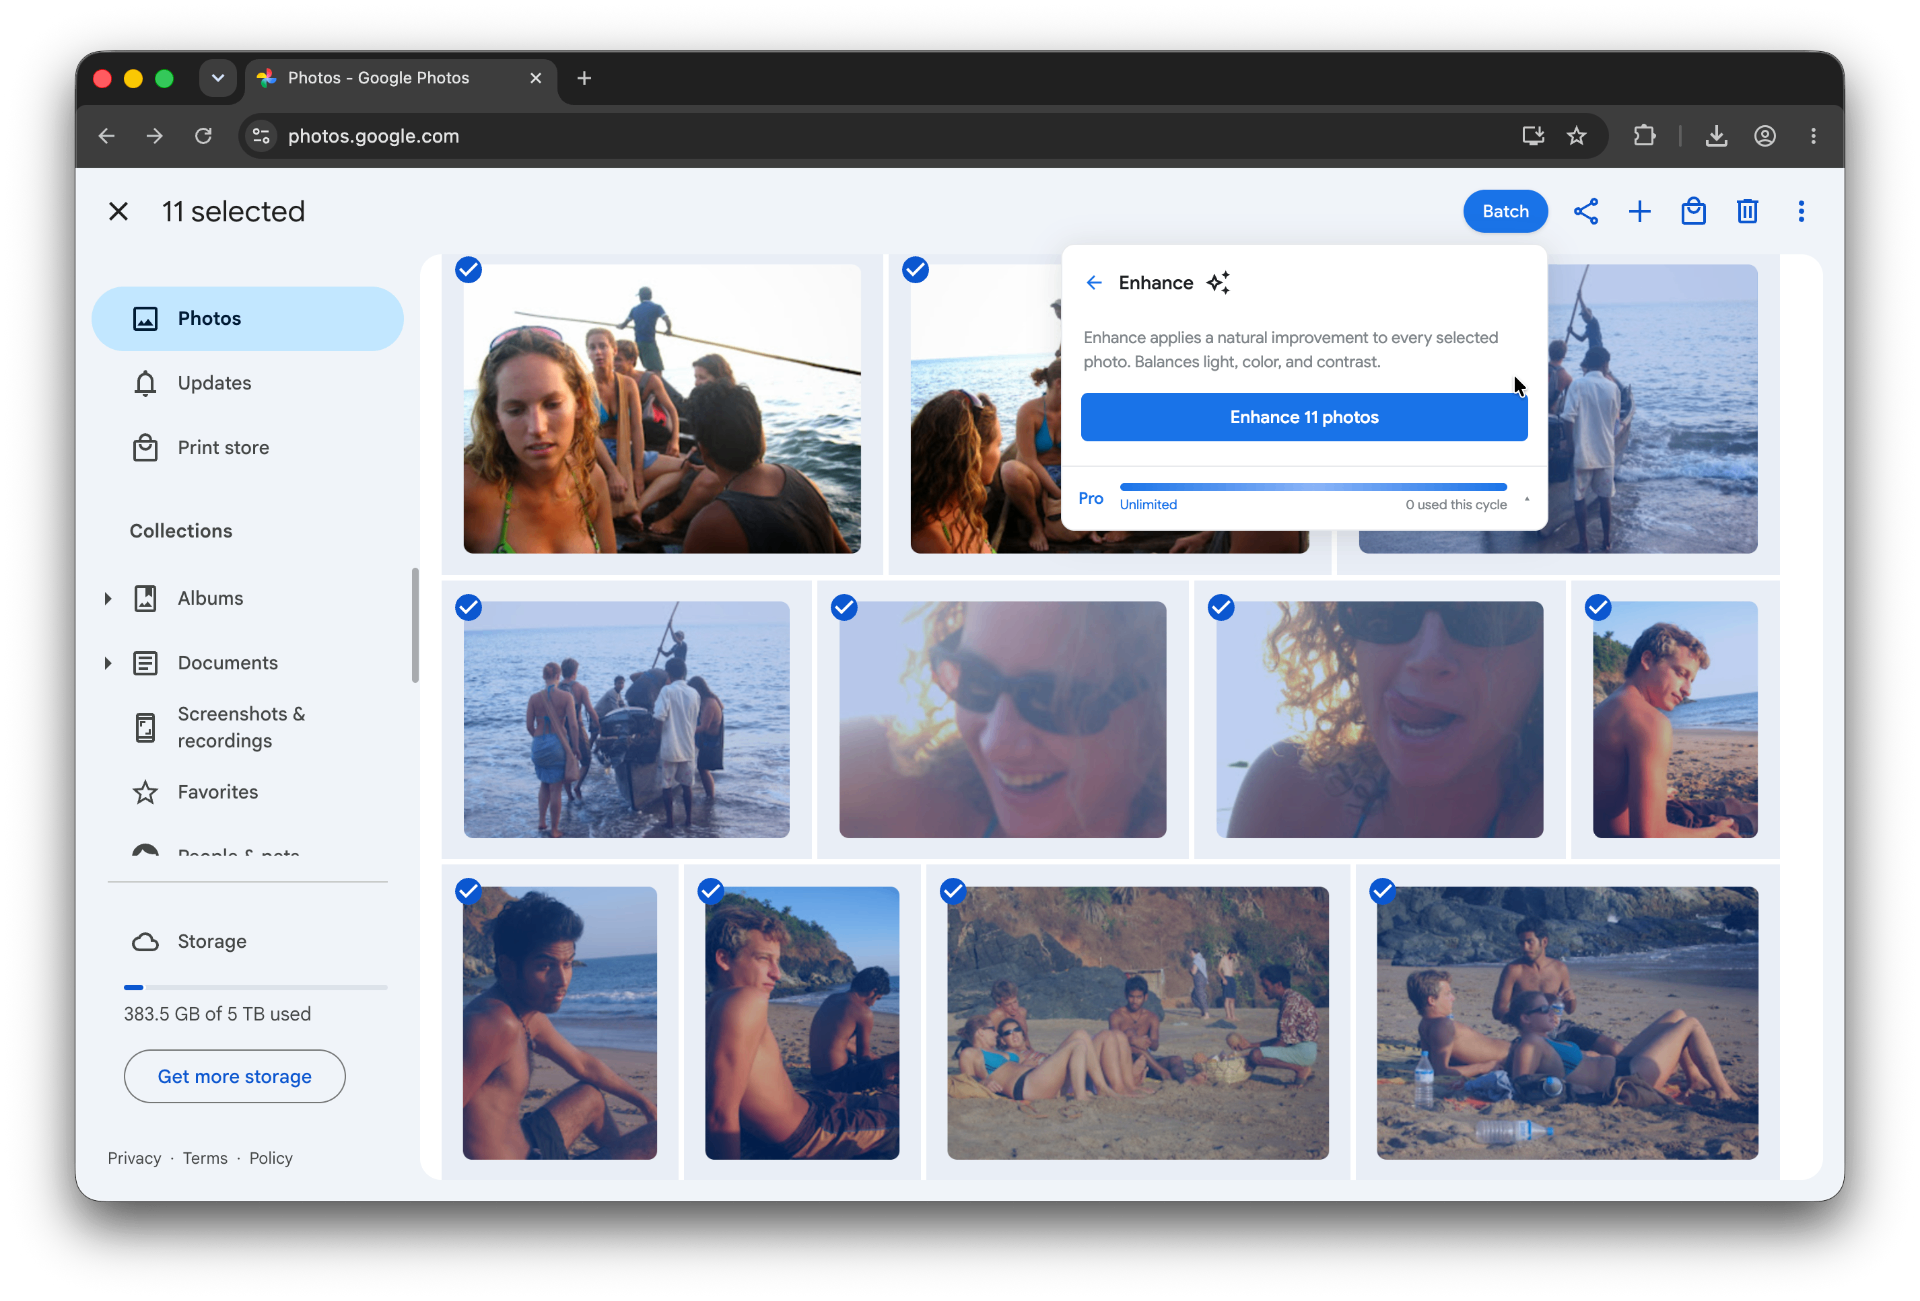
Or do it across your whole trip at once.
Batch for Google Photos is a Chrome extension built for exactly this. Batch never uploads your photos. The edits happen in your open Google Photos tab. For the full step-by-step version, see our guide to batch editing Google Photos. Select all the photos in your trip album (or use the Memories grouping if you didn't create a separate album yet), click Batch in the toolbar, choose Auto Enhance, and let Batch work through the selection while the tab stays open. 340 photos take about 45 minutes hands-off. You can read, cook dinner, do laundry, anything that doesn't require the Google Photos tab. When you come back, the album is ready.
A practical note for trip photos specifically: Auto Enhance generally improves dim restaurant photos and underexposed sunset shots dramatically, but it can over-saturate already-vivid scenes (bright tropical water, flowers in full bloom, a dramatic sunset). After the batch finishes, scroll quickly through the boldest-color photos and spot-check that the colors didn't get pushed past the point of looking real.
Plus is the right tier for ongoing work. Most travelers run this workflow several times a year (every trip, every long weekend, every visit to family). The volume builds quickly.
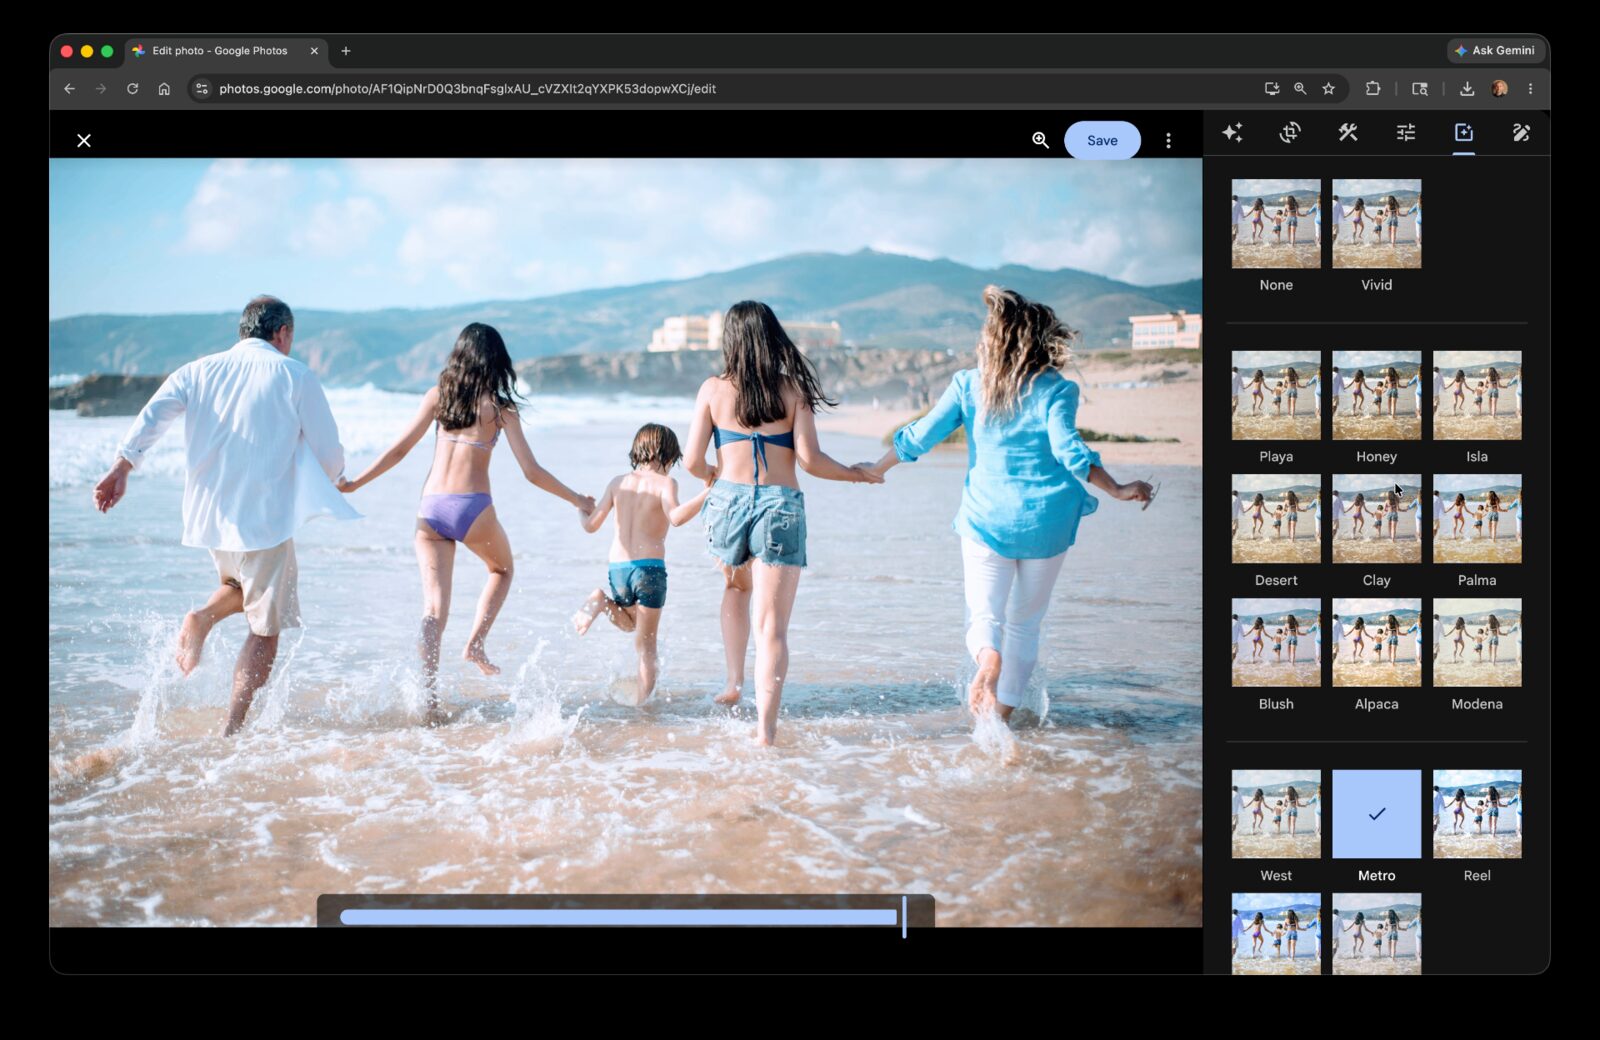
Applying a consistent travel filter
The Auto Enhance pass corrects each photo individually. The filter pass makes the album feel like one trip rather than a collection of thirty different photos taken on the same days.
Google Photos has a library of named filters, each with an intensity slider. A filter pass is optional, use it when you want the album to feel more consistent, not when the photos already look natural. For travel photos, a slight warm or film-tone filter can pull a mixed batch into a cohesive album, but it's a tool, not a requirement.
Single-photo workflow: open a photo, go to the Filters tab, pick a filter, dial the intensity to where it looks good without looking heavy. The intensity slider matters more than the filter choice, a heavily-applied light filter looks worse than a lightly-applied bold filter.
Or apply the same filter at the same intensity across all your trip photos with batch filter. The Batch interface lets you pick the filter, set the intensity, and run it across the whole album. The output is a consistently-styled trip album that reads as one curated story.
A tip: don't go heavier than 60 percent intensity for trip photos. At high intensity, Google's filters can blow out skin tones in the people-shots, which is exactly what you'll most want to send to family. The filter should be invisible to your aunt; if she notices it, it's too heavy.
Plus is the right tier for ongoing work. Trip filter passes a few times a year sit comfortably inside the monthly Plus quota.
Cropping the keepers for Instagram and prints
After the editing and filter passes, you'll want to share specific photos to specific places. Instagram squares (1:1), Stories (9:16), Reels covers, prints (4x6, 5x7, 8x10), framed photos for home (varies). Each format has a different aspect ratio.
Single-photo cropping: open the photo, Crop tab, pick the aspect ratio from the presets, adjust the frame, save. About thirty seconds per photo. For 30 keepers going to Instagram squares, that's 15 minutes of repetitive cropping.
Or apply the same aspect ratio across the keeper subset with batch cropping. Same Batch tool. Pick 1:1, run, done. Want to also crop for Stories? Run again with 9:16.
A tip: a few of your best landscape shots are likely 16:9 in source, wide-angle scenic shots of vistas, beaches, mountain ranges. Don't crop those to square for Instagram; they'll lose half the scene. Save the squares for portrait-oriented or compact subjects, and post the landscapes as 4:5 portraits or carousel sequences instead.
Plus is the right tier for ongoing work. A few trips a year, with Instagram and print crops on the keepers, fits inside the monthly Plus quota.
Sharing the album with friends and family
The album is edited, filtered, cropped. Time to share it with the people who weren't on the trip.
In Google Photos, open the album, tap Share, choose either link sharing (anyone with the link can view) or partner sharing (specific people you've added). Link sharing is the simplest path for sending to a group, text the link or paste it into an email, recipients open it in a browser, no Google account required to view.
For friends who'd appreciate a more curated experience than a raw album, Google Photos has a slideshow feature that plays the album. Useful for the next family gathering when the trip comes up in conversation, open the album, hit slideshow, hand the laptop to your aunt.
For family who'd appreciate something physical: Google Photo Books print directly from the album. The layout builder walks you through page-by-page or auto-fill options. A 30-page trip book delivered to someone who couldn't come on the trip is a different kind of share than a link they'll click once. The book sits on a coffee table; the link gets lost in the inbox.
A shared trip album becomes a small archive. The people who couldn't travel with you get to see what you saw, and a year from now you'll thank yourself for taking the hour to clean it up properly.
You've got the trip workflow. The same arc, organize, enhance, filter, crop, share, applies to anything else you photograph at the scale of a single project.
The pillar guide on editing photos in Google Photos covers the editor's tools in depth, including the parts of the GP editor this post didn't dive into (manual Adjust sliders, the AI suggestions, the post-trip Memories views). Worth a read for the parts of your library that aren't trip work.
The wedding photos post walks through a parallel post-event workflow at much higher volume, 1,000+ photos and a similar enhance-crop-caption arc. If your honeymoon is the trip, that's the post.
The kids' sports and school photos post covers the same workflow at the scale of a single tournament or event, useful if you're a parent who's already thinking about the season's worth of photos waiting for the same treatment.
If you want the trip album to feel like one trip even though the lighting changed every day, the Custom Presets guide walks through saving a gentle preset (a little warmth, a little saturation, lifted shadows) and applying it across the whole album in one pass. It's the cohesion layer Auto Enhance can't give you on its own.
Your trip lives in the photos you took. Edit them like the trip mattered.
Turn the trip backlog into an album you actually share
Batch helps enhance and crop selected vacation photos in Google Photos.
Start free · Works in Chrome on desktop · Photos stay in Google Photos
Where to go next
- How to bulk edit Google PhotosThe pillar guide to bulk editing in Google Photos.
- Cleaning up wedding photos in Google PhotosFinish the guest album before the photographer's gallery arrives.
- Editing sports photos in Google PhotosProcess tonight's game photos before bed, not next weekend.
- Free up Google Photos storage by converting Live Photos to stillsReclaim Google Photos storage by converting Live Photos to stills in bulk.