Restoring old family photos in Google Photos
Bulk edit old family photos in Google Photos — enhance, rotate, crop, and describe scanned archives without losing the originals.
Batch is not affiliated with Google. Google Photos is a trademark of Google LLC.
You've scanned 500 family photos. They're in Google Photos. They all need work. Doing them one at a time means months of evenings, and the project is already months in. Some photos are faded, some scratched, some yellowed by the chemistry of the era they were printed in. They're the only record of people who aren't around anymore. They deserve a better afternoon than getting tucked back into a shoebox.
This is a project guide, not a quick-edit pass. Family archive work is multi-month: scanning, organizing, restoring, captioning, sharing. The pieces all matter, and the order matters too. You don't restore 500 photos in one sitting; you build a workflow that gets you through the project without burning out, and you accept that the project is the work.
A note on dedicated restoration tools before this post starts. Reimagine, MyHeritage's restoration suite, and dedicated AI restoration apps are all genuinely better than Google Photos at single-photo museum-quality restoration of severely damaged images. If you have one critical photo (your grandparents' wedding portrait, the only existing image of a great-grandmother), pay for a professional restoration or use a dedicated tool for that one photo. This post is about the other 499. The everyday family photos that don't need museum-quality work but do need consistent treatment so the archive reads as one collection.
Here's the arc. Get the photos scanned and into Google Photos. Organize by decade, family branch, or event. Triage what's worth restoring. Enhance color and contrast on the faded scans. Crop and straighten the ones that came in tilted. Caption the people, places, and dates so future generations can find them. Share the restored archive as a printed photo book, a family website, or a shared album.
This post will not restore severely damaged single photos to museum quality. It will not colorize black-and-white. It will not replace dedicated restoration AI for the hero photos in your archive. It will get you through the volume work that makes the archive shareable.
Scanning your old photos into Google Photos
Three scanning paths cover most family historians. Pick the one that matches your archive's size and your budget.
Google PhotoScan, the phone-based scanning app, is the fastest option for small-to-medium archives. The app's flickerless scan flow captures multiple frames of each photo to remove glare, then stitches them together. The output goes directly into your Google Photos library. PhotoScan's resolution ceiling is lower than a flatbed's, but for most family snapshot prints (4x6, 5x7), it's enough.
Flatbed scanning is the higher-quality, much slower option. Most consumer flatbeds scan at 300 to 600 dpi for prints; for negatives or slides, you want 1200+ dpi. Plan on 1 to 2 minutes per photo at quality settings, so a 500-photo archive is 10 to 15 hours of scanning time alone, which is why most family historians break the project into evening sessions over weeks. Flatbed software exports to a folder on your computer; from there, drag-and-drop into photos.google.com or use the Google Photos desktop uploader.
Hire a scanning service for very large archives where time matters more than money. ScanMyPhotos, Legacybox, EverPresent, and similar services accept your physical photos by mail and return digital files (often loaded onto a USB drive or shared via cloud). Pricing varies, often per photo, with cost depending on resolution, turnaround time, and whether you scan prints, slides, or negatives. For a 2,000+ photo archive, the cost can be reasonable compared to the dozens of hours you'd otherwise spend on a flatbed.
A tip: scan your most damaged photos at the highest quality you have available. Those are the ones where the source resolution matters most for downstream restoration. The everyday family snapshot can scan at lower quality without consequence; the only existing photo of your great-grandmother on her wedding day deserves the slowest, highest-resolution scan you can produce.
Organizing by decade, family branch, or event
Once the scans are in Google Photos, the organization decision shapes everything that follows. Three schemes cover most family archives, each with tradeoffs.
By decade ("1960s," "1970s," "1980s," etc.) is the easiest scheme for chronological tagging. You can assign a photo to a decade quickly even when you're not sure of the exact year. The downside is that finding specific people across decades requires a second pass. Your great-uncle in the 1960s and your great-uncle in the 1980s live in separate albums, and you need to remember to look in both.
By family branch ("Mom's side," "Dad's side," "Mom's grandparents," "Dad's grandparents") is the best scheme for genealogy work. It mirrors how the archive will be used: researching one branch at a time, building a family tree on Ancestry or MyHeritage. The downside is that it requires more upfront tagging and more decisions about ambiguous photos (where does a photo from a wedding that united the two branches go?).
By event ("Grandparents' 50th anniversary," "Family reunions," "Christmas mornings") is the best scheme for archive narrative. It tells a story rather than building a database. The downside is that it's the most labor-intensive. You need to identify each event before you can categorize, and many photos won't fit a known event.
Album creation lives in your library. Google Photos' face grouping auto-identifies recurring people, which is a strong organizing layer for old photos. The face groups work less well on faded or damaged scans, but for the photos in good shape, they save substantial tagging time.
A tip: pick one organization scheme and commit. Switching schemes mid-project doubles your work and creates duplicates across albums. The decade scheme is the safest default. It works for almost any archive and doesn't require advance research.
Choosing what's worth restoring: triage
The triage moment is what makes the project finishable. Of 500 scanned photos, realistically 100 to 200 are worth full restoration effort; the rest are good enough as-is or too damaged to recover. Trying to restore everything is the path to abandoning the project.
A simple framework: three tiers.
Tier 1 is the hero photos: the ones that will go in the family book, the ones you'd reproduce as gifts, the ones that tell the archive's most important moments. Maybe 20 to 50 photos in a 500-photo archive. These deserve full restoration: dedicated tool work, manual sliders, possibly professional restoration for the most damaged.
Tier 2 is the everyday family photos. Snapshots from holidays, vacations, school events, family dinners. Maybe 100 to 200 photos. These benefit from a batch enhance pass (color and contrast restored), but not photo-by-photo manual work. This is the volume the rest of the post handles.
Tier 3 is archival reference: photos that document a person or place but aren't visually compelling, like class portraits, group shots from large family events, or photos of houses or cars from the era. Maybe 200 to 300 photos. These don't need editing; they need captioning so they're findable, but their visual state is acceptable as-is.
Use Google Photos' favorites or star feature for Tier 1 specifically. The starred shortlist is your priority queue for the dedicated restoration work.
A tip: don't try to restore every photo. The archive's value is in the story it tells, and a faded everyday photo often tells the story better than a perfectly restored one. The grandmother in the slightly faded snapshot from 1972 looks like 1972; the same grandmother artificially restored to perfect color looks like a manipulation. Resist the urge to over-polish Tier 3.
Enhancing color and contrast on faded scans
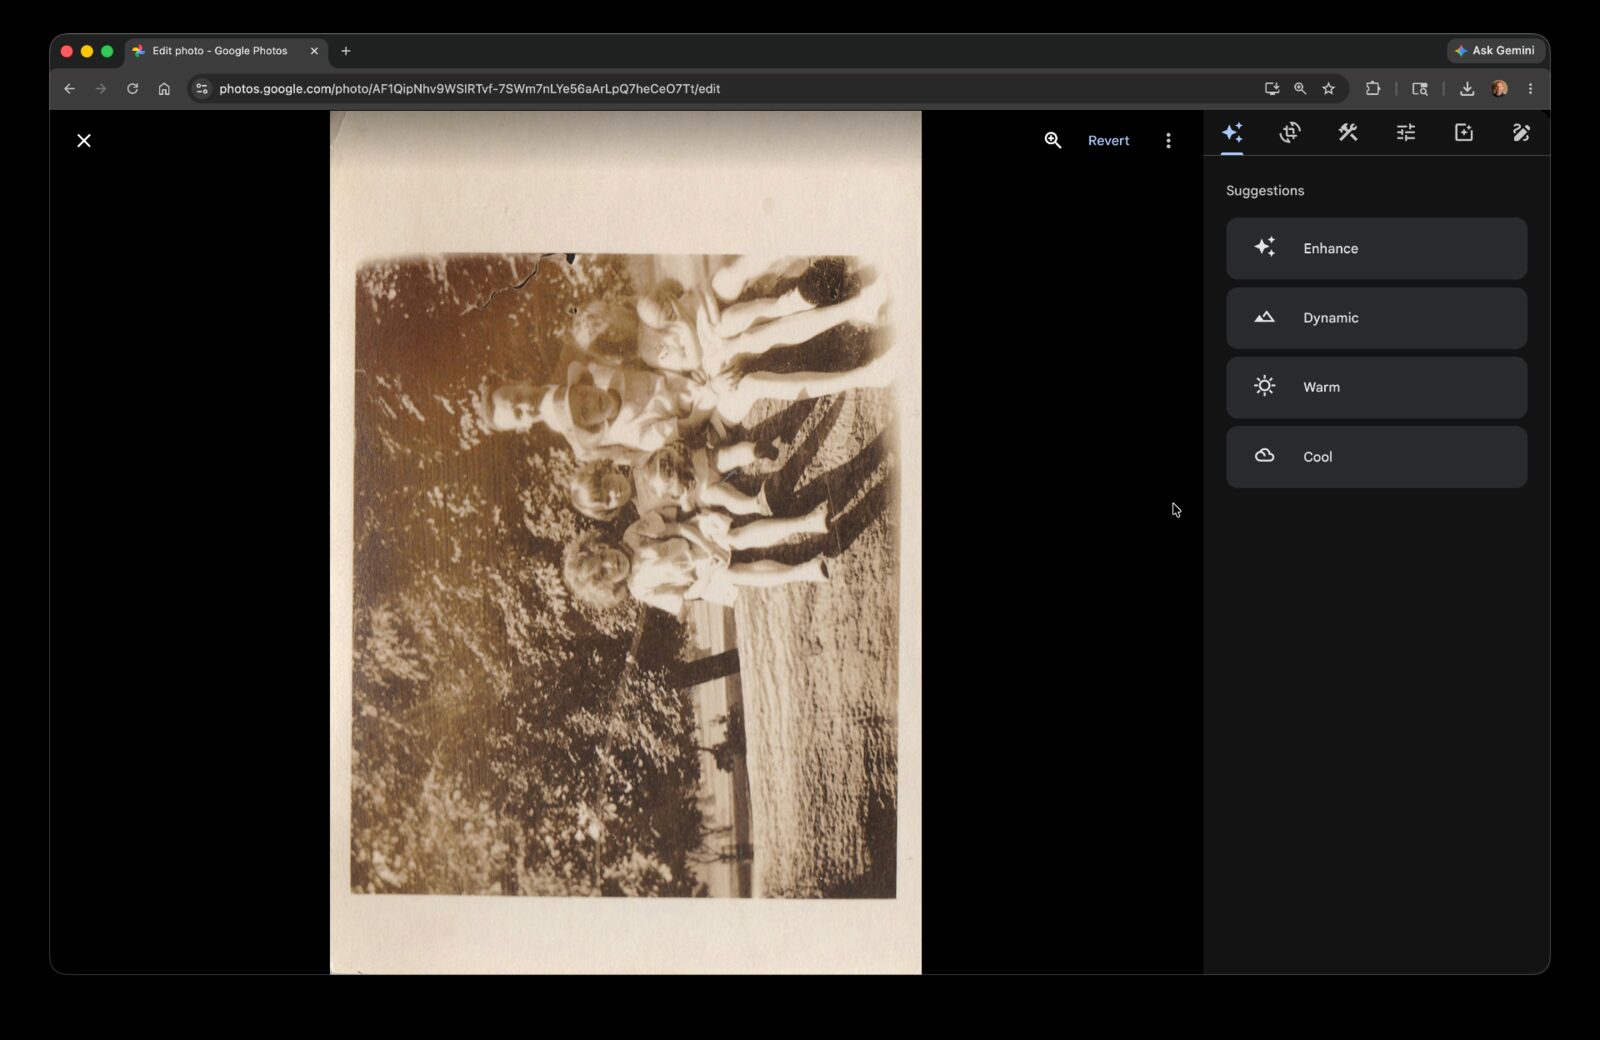
Auto Enhance can work well on many faded scans. Many family snapshots fade in familiar ways: lower contrast, warmer color casts, washed-out midtones. Auto Enhance corrects most of this in one pass.
Single-photo workflow: open the photo, tap Edit, tap Auto Enhance, tap Save. The Auto Enhance pass typically lifts the contrast, neutralizes the color cast, and brightens the midtones. The result looks closer to how the photo looked when it was first printed, before decades of aging.
For 200 Tier 2 photos, manual Auto Enhance is about 30 to 35 minutes. Doing this evening by evening means you'll be at it for a week before you can even start the family book. The scanning took weeks; the captioning will take more weeks; the editing alone shouldn't be the bottleneck.
Or do it across all 200 at once.
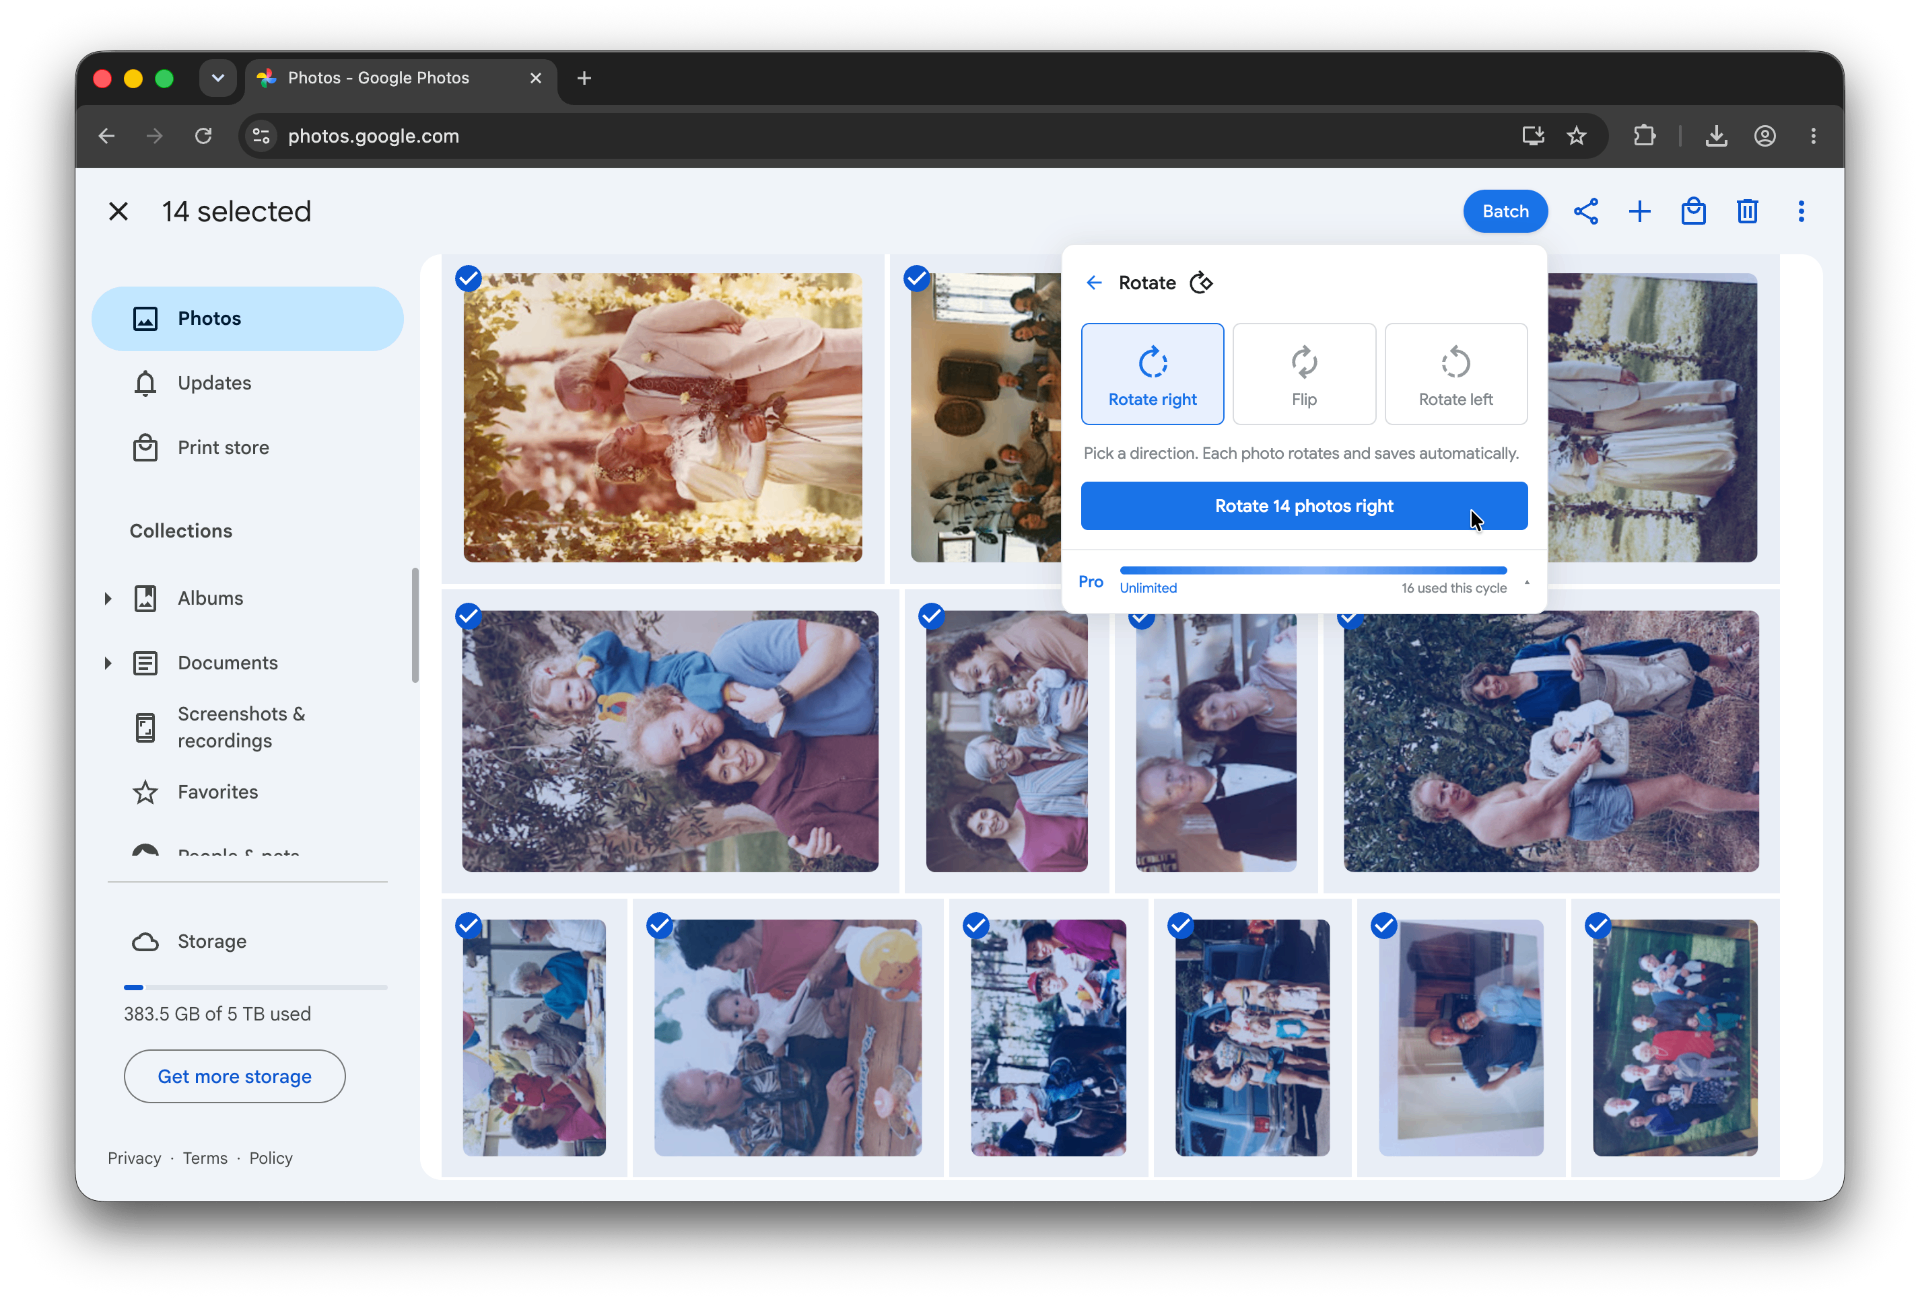
Batch for Google Photos is a Chrome extension built for exactly this kind of repetitive single-photo work across a selection. Batch never uploads your photos. The edits happen in your open Google Photos tab. For the full step-by-step version, see our guide to batch editing Google Photos. Open your decade or branch album in Google Photos, select the Tier 2 photos, click Batch in the toolbar, choose Auto Enhance, and let Batch work through the selection while the tab stays open. 200 photos take about 30 minutes hands-off. You can read, do laundry, or work on captioning a different batch while the Google Photos tab stays open.
A practical note for old photos specifically: Auto Enhance occasionally pushes faded reds toward magenta. Spot-check 5 to 10 photos for color accuracy after the batch finishes, especially any Polaroid-era prints (Polaroids fade to a pink/orange cast that Auto Enhance over-corrects). For Tier 1 hero photos, don't use Batch, use Reimagine, a dedicated restoration tool, or pay for professional work. Batch is for the Tier 2 volume; the heroes deserve individual attention.
Pro for the month you're tackling this. The full project, enhance, crop, caption, runs through hundreds of photos in the same workflow, and the Pro tier covers unlimited photos for the month. When the project is done, the photos and your edits are yours regardless of which tier you stay on.
Cropping and straightening scanned photos
Scanned photos come with their own set of small problems. Photos placed on the scanner bed tilt slightly. The scanner glass adds white borders around the edges. Some photos got over-cropped during scanning and have margins of black or white that need trimming.
Google Photos' Crop tool includes a Straighten control. For one photo: open, Edit, Crop tab, use the rotation dial to straighten, drag the crop frame to trim borders, save. Each photo takes about a minute if it needs both straightening and cropping.
For 200 photos that need similar treatment, straightening and border-trimming, manual is 25 to 30 minutes if you're focused. The work itself isn't hard; it's the volume that wears down attention.
Batch crop helps with consistent borders and aspect ratios when the scans share source dimensions, all 4x6 prints from one decade, all 5x7 prints from another. Mixing dimensions in one batch gives you uneven results. Straightening is more sensitive than cropping; visibly tilted scans may still need a manual pass per photo, since the right rotation depends on each photo's specific tilt.
A tip: when you're scanning, leave the white border in place rather than over-cropping at scan time. You can always crop the border out later, but you can't add detail back if you over-cropped during the scan. Better to have a quarter-inch of scanner border around every photo than to lose a millimeter of the photo itself.
Pro for the month you're tackling this.
Captioning relatives and dates for the next generation
The captioning section is the most valuable in this entire post. Captions transform a pile of photos into a navigable archive, without them, scanned old photos are nothing but images; with them, they're a family history.
Manually adding a caption: tap the photo, swipe up to open the info panel, tap "Add a description." The description field accepts free text and becomes searchable across your library.
What to include in each caption: people's full names, relationships, location, year (or decade if year is uncertain), event. "My grandmother, Eleanor Mae (Johnson) Smith, on her wedding day with my grandfather, Robert James Smith, June 1947, at her parents' home in Springfield, Illinois." That's the gold standard. For Tier 3 archival photos where you only know "Aunt Mae, 1960s," that's also fine, partial information is better than none.
A reusable formula for the everyday photos: full name · relationship · place · event · approximate date · source if known. Example: "Eleanor Mae (Johnson) Smith · grandmother · Springfield, Illinois · wedding day · June 1947 · scanned from Aunt Ruth's album." The formula keeps the work consistent across hundreds of photos and makes the archive easier to search later.
Google Photos' face grouping is the AI baseline. It auto-identifies recurring people across your library. For old photos, face groups work less reliably, faces in faded scans don't match faces in modern photos as well as they should, but they work well enough for a starting layer of organization. Don't rely on face groups for the captioning work itself; type the names.
For batch-level captions, every photo from one event or one shoot can share a base caption. "Smith family reunion, Lake Michigan, August 1968" goes on every photo from that event, with per-photo additions for individual identification later. Batch's Add Caption applies the same caption (or caption template) across a whole selection.
A tip: caption with full names, not nicknames. "Aunt Eleanor" doesn't help your great-grandkids when they Google your archive in 2080. Type "Eleanor Mae (Johnson) Smith." Include maiden names in parentheses. Include dates even when approximate ("c. 1947"). This is the single most valuable hour you'll spend on the archive, and the work that makes the archive useful for generations beyond your own.
Pro for the month you're tackling this.
Sharing the restored archive: building a family book or website
The photos are restored, captioned, and organized. Time to share the archive.
Four sharing options cover most family historians.
Google Photos shared albums are the easiest. Create an album of your favorites (probably a curated subset of Tier 1 and Tier 2), turn on link sharing, send the link to family members. Relatives with Google accounts can view inline; relatives without can view in a browser without signing in.
Google Photo Books are the highest-impact gift. Print a physical book directly from a Google Photos album. For many families, a printed photo book becomes the version people actually keep, a 50-page hardcover book of family photos with your captions becomes the artifact that gets passed down. The photo book builder is straightforward: choose layout, drop photos in, add cover, order. Pricing is roughly comparable to printing the same book at Shutterfly, but the integration with Google Photos saves the export-and-re-upload step.
Third-party photo book services (Mixbook, Shutterfly, Artifact Uprising) produce higher-quality books at higher prices. They require exporting from Google Photos first, but the print quality is noticeably better for the heritage photos that deserve archival presentation.
A family website is the option for the most ambitious projects. Google Sites accepts embedded Google Photos albums and is free; the result is a browsable family archive accessible to anyone with the URL. For genealogy projects connected to Ancestry or MyHeritage, those platforms have their own family-tree-with-photos interfaces that may serve better than a generic website.
This archive is a multigenerational gift. The hour you spent captioning Eleanor Mae becomes a story your great-grandchildren can read about a person who would otherwise have been a name on a tree. Take the hour.
You've got the project workflow. The skills generalize beyond the family archive.
The pillar guide on editing photos in Google Photos covers the editor's tools in depth, useful for the captioning approach in particular, which applies to any library where you want to find photos years later.
The wedding photos post walks through a parallel post-event workflow, with the same captioning emphasis applied to a single major event rather than a multi-decade archive. If you have a recent wedding to add to the archive, the wedding post's workflow handles a single major event the same way this post handles a decade.
The vacation photos post covers the sharing approach in detail, Google Photo Books, shared albums, sharing with family who don't use Google. The same patterns apply directly to the archive sharing work.
Your family archive becomes the family record. Caption it like the people in it would want to be remembered.
Make the archive easier to finish
Batch helps enhance, rotate, crop, and describe scanned family photos at project scale.
Start free · Works in Chrome on desktop · Photos stay in Google Photos
Where to go next
- How to bulk edit Google PhotosThe pillar guide to bulk editing in Google Photos.
- Cleaning up wedding photos in Google PhotosFinish the guest album before the photographer's gallery arrives.
- Enhancing vacation photos in Google PhotosFinish the vacation album in a Sunday afternoon.
- Free up Google Photos storage by converting Live Photos to stillsReclaim Google Photos storage by converting Live Photos to stills in bulk.